Wednesday, March 28, 2018

Cookies for Easter

It's that time of the year again when I get to bake these cookies....

Before baking


Even if I've made them in different moulds many times now, the outcome never ceases to fascinate me! The details are just amazing!

After baking

Springerle cookies differ from most cookies as it uses baker's ammonia as the leavening agent.  (Baker's ammonia was the primary leavening agent used before baking soda and baking powder came to being. ) They have to be air-dried for about 24 hours before baking in order to keep the integrity of their design and are baked at quite a low temperature, resulting in a white cookie.  They are soft and cakey, rather than crisp or crunchy. They are traditionally flavoured with anise but since I don't like anise, I use vanilla extract as flavouring instead.

Springerle moulds are quite expensive and hard to find here in Australia. I have 7 of them now but I bought them one at a time over the course of three years 😉. I only make these cookies for special occasions like Christmas and Easter.

Last October, when two of my kids flew to the US to attend their cousin's wedding in NY, I sent over these...


I made sure I packed the cookies really, really well so they would make it to the US intact! Thankfully, they did!


Last Christmas season, I sent another batch overseas, this time to my family in the Philippines.  My brother, who also lives here in Melbourne, went home for another brother's 60th birthday.


If you would like to learn how to make springerle cookies, HERE is where I learned to make them from.  You can find a lot of moulds online especially in the US.  One of my favourite shops to get them from is this Etsy shop. In Australia, I found some here. I hope you will be encouraged to try them!

I wish you all a blessed and meaningful Holy Week. May you experience Christ's glorious Resurrection and be filled with true Easter Joy all the days of your life!


PS.  I have listed another four "Cakes from the Heart" softcover books in my Etsy.  As these copies were printed before the error on the Yema Cake page was discovered, I will be sending the corrected PDF along with the book. Anyone interested, just head on over to my shop!

Friday, March 16, 2018

How to make a pillowcase with an inner flap

Remember this cake?


This was the cake I made for my grandson's first birthday, remember?  I made it to look like his much loved teddy bear (which we fondly call "Bearie"). At 2 years and 7 months old now, he still sleeps with Bearie, along with a whole lot of other cuddly creatures.


This post is not about the teddy bear or cake though.  It is about pillowcases! I've been making lots of them lately. 


I've never bought licensed beddings before as they are really expensive. Licensed fabrics are too, so I only buy them when they are on sale. Now my grandson has lots of pillowcases with his favourite characters on them 😍!


I thought you might like to learn how to make these pillowcases. They are great for any level of sewer, even beginners. Simple straight stitches and no serger required. They are fun and super easy to make! Here goes...

HOW TO SEW PILLOWCASES WITH INNER FLAPS

For a pair of pillowcases, you will need:

1 meter (or yard) printed quilting weight cotton fabric (for the pillowcase front)
1 meter (or yard) coordinating plain quilting weight cotton fabric (for the pillowcase back)
coordinating thread
sewing machine
other sewing essentials like ruler, fabric markers, pins, scissors. etc.

Before you begin this project, find a pillowcase that you already have that suits the size of your pillows. You need to base your measurements on your pillowcase because "standard" sizes vary.

Measure the length (longer side) and the width (shorter side) of your pillowcase. (I will be using inches in the tutorial.) Take note of these dimensions as your Length (L) and your Width (L).

1. From your printed fabric, cut two pieces with dimensions: L plus 2" by W plus 2".  From your plain fabric, cut two pieces with dimensions: L plus 7" by W plus 2".


2. With wrong side facing up and shorter side on the top, fold the top of your printed fabric 1/2" in.  Press. Then fold another 1/2" in. Press again.


2. Do the same thing with your plain fabric. After the two 1/2" folds, fold again 5" down. Press.


3. Stitch the 1/2" folds on both printed and plain fabrics.


4.  With wrong sides facing, place the front and back of the pillowcase together. Pin in place.


5. Using a 1/2" seam allowance, stitch down one long side, then along the bottom, then up the other long side.  Do not stitch the top of the pillowcase!


6. Trim the seam allowance to about 1/8". Clip the bottom corners as well. Be careful not to cut into the stitches!


7. Turn the pillowcase wrong side out. Push the seams and corners out well.


8. Turn the flap over to the front side. Doing so will enclose the opening at the top. Make sure the top edges of the two fabrics are aligned well, especially the corners. Pin in place.


9. Sew the bottom and sides as in step 5.


10.  Turn the flap over to the back side (revealing the pillowcase opening), then turn the pillowcase right side out. That's it! Too easy, right? Now go make the other one!


And then some more!


Hope you find that helpful! Next time, I will show you one way you can make use of the excess pillowcase fabrics.

Have a good weekend ahead!

Wednesday, February 28, 2018

One last backpack (and some printed books for sale!)

{If you aren't interested to read about the backpack (again) then feel free to scroll down to the bottom for some news on the printed "Cakes from the Heart" book I am selling.}

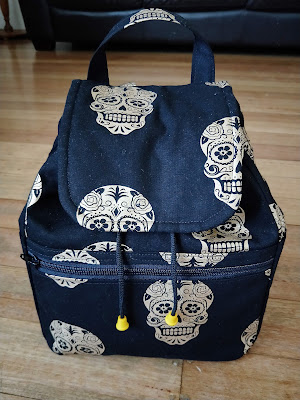
So...I'm back again with one last backpack.  As I've mentioned the other day, I was going to make another bag, this time, for an adult.  I am actually giving this to my soon-to-be 22 years old niece for her birthday in March.  I noticed she was more into fabric drawstring and/or tote bags than leather bags so I thought this would be a perfect present for her 😄.


The fabric is again a Japanese cotton duck.  The skulls are actually shiny, metallic gold in person.  When I first saw this fabric at Spotlight, I knew straightaway that this would make a great bag for my niece.


The lining is again a pre-quilted fabric, this time in black.  


Unfortunately, I made a mistake in cutting the fabric pieces for the side pockets, so instead of them being elasticized, I had to make do with simple slip pockets 😭.  They're alright, I guess, but I was a little disappointed nonetheless.


I ran out of polyester webbing so I just made the fabric straps.  They turned out well and coordinated with the black plastic sliders.

I am so pleased with the three backpacks that I made and I certainly loved the time I spent sewing them, even it meant late nights for me! I probably will pack up my sewing machine for now (or if I can be bothered, I might just make small zippered bags and/or wristlets out of the excess fabrics before doing so!).

Ok, so now for some news on the printed book.  I recently ordered three more softcover copies from Blurb as they were discounted again.  I have now listed them on my Etsy shop.  The price is still much lower than the selling price over at Blurb but higher than the first time I listed printed books on Etsy because my price depends on how much I got them for (meaning how much discount I received). If you are interested in purchasing a copy, you can do so here.

Have a good week!

Saturday, February 24, 2018

Backpacks

I wanted to veer away from cakes for a short bit and talk about one of my other loves..........sewing!

I am guessing that most of you weren't here from the very start.  Way back before the cakes started, I was so into sewing and those following me were more into crafting than baking.  Not long after I learned how to sew simple tote bags from the internet, I started making bag tutorials myself.  Two of the most visited (non-cake) posts here are, in fact, my messenger bag and city backpack tutorials.  I was and still am, very proud of those bags, because I created them at a time when I was still very inexperienced in sewing.

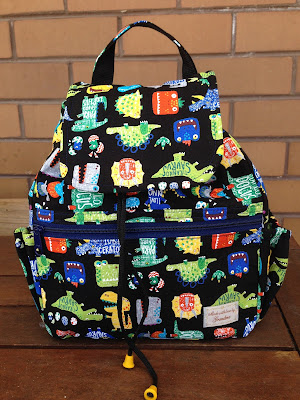
Shortly before my grandson was born, I sewed lots and lots of things for him - quilts, blankets, rompers, bibs, nappy stacker, jacket, small pillowcases, etc. but one thing I didn't get to make was a bag! Now that he is two and a half years old and going to daycare once a week, I thought of making him a small backpack 😄. I used the same pattern for the city backpack but I changed it a bit to make it more kiddie-friendly.  I turned the slip front pocket into a zippered one and I also added elasticized side pockets.

Here is the first bag I came up with.  The fabric is a heavy Japanese cotton duck with dinosaur prints (Lachie's fixation nowadays is dinosaurs!).

Isn't that so adorable?
I reinforced the fabric straps with polyester webbing.  They turned out very sturdy but was quite thick to sew into and I had to force them into the metal sliders.


Instead of sewing a drawstring from fabric (as with the original city backpack), I used a nylon cord and a coordinating cord stopper.


The bag lining is a pre-quilted fabric.  I have used this kind of fabric with many of the bags I have made in the past.  I like not only the look of it but also it's thickness and softness.


After I finished the bag, I realized that the side pockets were a little short.  It was ok for a small drink bottle but taller bottles might fall out 😞.


For a final touch, I ironed on a label. Everything I make for my little one is made with love, of course!


Although I was very happy with the dinosaur backpack, I decided to make another one because I wasn't satisfied with the side pockets.  Here is the second one, now with a similar Japanese cotton duck, this time with doggy prints 😉!


The side pockets are now taller.


It holds Lachie's bigger drink bottle more securely.


The straps are much simpler with just polyester webbing.


The lining is still the same pre-quilted fabric!


And of course, still with the "Made with love by Grandma" label 💓.


Overall, having made these bags, I'm one happy grandma!

I still have one more backpack lined up.  My fabric this time is for an adult.  I will do the backpack the same way.  Let's see how it will turn out!

Monday, February 12, 2018

Thank you (and some good news!)

Just dropping in really quickly to say a huge 'Thank You!" to everyone who bought the Cakes from the Heart eBook in the last couple of weeks! It has been heartwarming (and a bit overwhelming) to know that many of you really believe in what I do and want to continue baking with me and learning from me. I hope you will have loads of fun baking all the cakes in the book! As much as you say I inspire you, I am also, in return, inspired by you, to continue creating and I am now really pushing myself further so I can deliver a Book 3 in the near future 😉. I hope my cakes will remain a part of all your family occasions for years to come!

Some of you have been asking if you can buy a printed copy of the book. As I've mentioned in my last post, I've checked the prices over at Blurb and they are really high! This book is even more pricey than the first book because it has more pages. Anyway, Blurb offers discounts quite often and if you sign up for an account, you will get notifications when these discounts are available. You don't really have to buy it at full price.

Recently, Blurb offered a 40% off if you buy at least 4 books so I took advantage and ordered my very first hard copies. After much anticipation, my books finally arrived today!


Just like the Frosted Heaven book, the cover came out a little bit dark. I don't blame the printer though.  To be honest, my cake photos aren't very professional and were all just taken from my old iPhone. I don't do any styling or what not. I take photos not really for the intention of putting them in a book.  It just so happens that they end up in one! The photos are not too bad though.  They just look better in their digital form!

Other than the darkness of the cover, everything else is great! I do feel ecstatic to see my hard work come to life.  I know it's a simple, little book but I am nevertheless proud. 😊

Anyway, I don't really need four copies of this book. I bought one hardbound book and three softcovers. The good news is....I have decided to sell the two softcovers on Etsy! If you really want to have a printed copy, here is your chance to get it at a much lower price! And whoever will buy these two copies will be the first two people (aside from me, of course) to own one!

Want it? Go get it from Etsy now!

UPDATE: The two copies are already SOLD. I am listing my THIRD and LAST softcover.  You can grab it here.

UPDATE: Third copy is SOLD as well.