Wednesday, August 25, 2010

When people are just rude

I am feeling quite low today, having received two rather shocking emails so early in the morning.  The first one was actually a comment made on my Messenger Bag tutorial post.  I had deleted it because I felt it had a toxic effect, but just for the purpose of discussion, here it is:


I would have preferred to contact this person personally but she had left no means of getting in touch with her.  I would have asked her what problems she encountered in her sewing.  That particular tutorial is the most accessed out of all my free tutorials in this site.  I have received a whole lot of emails from people who have successfully made their bags using the instructions.  The problem with some people is that they do not bother to read through the whole procedure before they start sewing.  I particularly stated in the beginning of that tutorial that "as a prerequisite to this project, you need to know how to install magnetic snaps and make zippered pockets".  I deliberately omitted these parts because explaining them would make the whole thing too long.  To compensate, I did include links to other tutorials tackling the things I skipped. If anything else was missing or unclear, all she had to do was ask and I would have helped.  Am I to blame then that her expensive fabric went to waste?

The messenger bag tutorial was one of the very first I ever made (more than two years ago).  I was not an expert sewer then and still, am not an expert sewer now.  My assumption has always been that, if I can do it, you can too.  Ultimately though, you are the best judge of your own skill level. 

The second blow I got today was from an eBay seller from the US.  Yesterday, I excitedly received my auction win in the mail.


According to the eBay listing, this cake pan set was supposedly made in the USA by CM Products, Illinois.  I inspected and inspected the box and the contents but nowhere was it marked as such.  What I found instead was this small sticker...


Made in Taiwan, ROC.  Not that I had any problem with that...the pans seemed of good quality anyway.  I felt though that I had to let the seller know.  I gave her a neutral rating with a feedback saying: "Item very well packed and received quickly, however, description was inaccurate".  Was that unfair?  Should I have just given her a positive rating despite? Maybe I shouldn't have left any feedback at all.

I immediately sent the seller an email to explain why I gave her the neutral rating.

"Just wanted to explain why I gave you a neutral feedback rating. The cake pan set is not made by CM Products, Illinois, as indicated in the listing. Nowhere in the box does it say that. There's a small sticker on the divider that says Made in Taiwan, which explains why the writing on the box had a lot of grammatical errors and wrong spelling! It does make a difference to me if it were made in the USA.

The cake pan set seems good quality anyhow and would hopefully withstand years of baking. Thanks for shipping quickly."

- heartofmary

Did that in any way sound offensive to you? Because I didn't mean to be at all. To tell you the truth, I wasn't prepared for the reply I got...

"The Immaculate Heart of Mary is very dear to my heart and my family ....

I am upset that you actually use her name and then make up lies about my product .... You received the item EXACTLY as pictured ... at a very REASONABLE price ... PACKAGED and SHIPPED PROPERLY .... I did not make up the words CM ENTERPRISES ... this is the information provided on either the product or the box ...

Your words are BLASPHEMY because you purchased it using the name of our LADY ....

You LIED for everyone to see and did not give me a chance to respond to your problem.... I would have refunded you 100% and let you keep the pan....... Honest sellers in this new age of eBay are at the mercy of buyers .....

I ship at least one item a week Down Under and have NEVER EVER been so disrespected from any of your countryman .....

My husband is a U.S. MARINE and spent some time in you beautiful country on his way HOME from combat in Viet Nam .....

I can not express how hurt I am that you could not have been up front with your problem on something that is as simple as a cake pan ....

We are 71 years old .... the money we make supplements my husbands retirement pay from the U.S.MARINE CORPS .....

GO BACK and look at my listing .... does it in anyway say that I was dishonest or trying to trick you ???

God Bless You and I pray you be more upfront with folks who are honest Sellers on eBay ..."

I could not imagine that a 71-year old would speak to me that way.  First of all, my eBay username "heartofmary" (as is the title of this blog), has absolutely no reference to the Virgin Mary.  My real name is Maria Corazon, which are Spanish for "Mary" and "Heart".  Secondly, never did I accuse her of being a liar, of being dishonest or trying to trick people.  Yes, the item was as pictured.  Yes, I won it at a reasonable price. And yes, it was properly packaged and shipped.  What I only pointed out was the inaccuracy in the description.  Why would I lie about those things?  What for?  Except for the sticker, there truly wasn't any indication of any manufacturer's name on the box or on the cake pans.  I will never ask for a refund because as I said, the pans seem of good quality (regardless of where it's made) and I will bake with them all I want!  

So sorry I had to bombard you with all that.  I had to let my feelings out and there's no one here to talk to at the moment.  All of a sudden, I am missing my family back home...and my mom...and am just getting all teary-eyed.  Tell me, why can people be so rude?


PS.  Last day to enter the GIVEAWAY!

Saturday, August 21, 2010

Cookies and Cream (plus GIVEAWAY extended)

Today is Federal Election day here in Australia.  I'm up early, hoping to cast my vote as soon as the polling place opens this morning.  But before I do that, let me just share a few things with you!

I finally got my own copy of The Cake Bible by Rose Levy Beranbaum from Amazon and am having a blast reading through it. Although I've read conflicting reviews about this book, it does seem to be a must-have for any baking enthusiast.  I've been purchasing a lot of cake and cupcake books the past year and have already learned a lot but I'm sure there's still so much more to gain.  I do think my self-studying have done my cake baking and decorating a whole lot of good.  When I see pictures of cakes I have made for my kids' birthdays years ago, it just makes me smile to think how things have improved!

I admit that it's not just been books that I've been buying a lot of.  I have heaps of caking tools now which I, of course, think are valuable to making beautiful cakes.  I also have loads of these...


I did some cleaning up yesterday and surprisingly found out how much baking cups I already have.  It filled the whole 6-liter container!  I reckon this will last me a lifetime!

The other night, I made a Cookies and Cream Cake, an order I got from my husband's workmate.  Was really very pleased with how it turned out...too bad I couldn't even get a slice of it! 


It was a good thing the Oreo cookies were on sale at the supermarket this week because I had to use a whole box!


To use up the leftover frosting, I baked some chocolate cupcakes yesterday.  I had some mini Oreos in the pantry to go with them as well.  Instant cookies and cream cupcakes for us!


Well, I better start making breakfast now so I can head on off to vote.  Before I end, let me just remind you about the GIVEAWAY from my last post.  The participation thus far has been dismal.  Makes me think that maybe no one is really interested in my Toilet Paper Roll Cozy pattern (?).  Where have my readers gone?  Come on, just join in!  There's nothing to lose! (Do I sound desperate?) Anyway, I've extended the giveway till middle of next week.  Hopefully, I will get more comments in.

Thanks and have a lovely day!

Wednesday, August 18, 2010

New eBook and GIVEAWAY!


Yes...I made another one of my pretty toilet paper roll cozies. This is very similar to the first one but I would say, is a much improved version. The size is more exact and also, it is sturdier because I had lined it with cotton batting. This way, it would hold its shape and won't collapse as the toilet paper is being used up.

I took pictures as I sewed. For whatever it's worth, I went ahead, laboured, and made the pattern and instructions for it. I personally think the cozy is a pretty neat idea, though I am unsure if many people will be interested in making one for themselves. It is really just one of those simple, functional things that I love creating.

To come up with one standard size for the cozy, I had to look at the different brands available in our local supermarket. I found that as far as sheet size is concerned, the Australian standard appears to be 11 cm by 10 cm (about 4.3" by 3.9"). However, different brands had various number of sheets per roll and also there's one-ply, two-ply and even three-ply. The main difference, I think though, lies on the thickness of the paper because this ultimately determines the total volume of the whole roll. For instance, the inexpensive supermarket brand with 210 sheets and thin paper had less volume than the more expensive kind with extra thick paper and only 180 sheets.

In the end, I decided to settle with the Kleenex brand. I figured, this was a brand that most likely existed worldwide. Its size and volume is also comparable to most of the other good-quality brands I saw. Having said that, I am quite certain the cozy will fit any regular, standard-sized toilet paper roll out there, whether it's Kleenex or not.

The eBook is finished and is now listed in my shops, here and here.

For a chance to win a FREE copy of this new eBook, just leave a comment below. Sign up to be a follower if you aren't one yet. And please do not forget to include your name, as well as a way to contact you (email, blog, etc) in case you win. Entries close on Sunday, the 22nd Wednesday, the 25th. Winner will be announced the following day, Monday, the 23rd Thursday, the 26th. Hope you can all join, thanks!

Thursday, August 12, 2010

Ube Macapuno Cake Recipe

UPDATE: Please also read a related post here.

Ever since I blogged about my Ube Cake ala Red Ribbon, a number of Filipinas have been emailing me to request for my recipe. I know this post is long overdue so good news, ladies, your wait is over!

This is my own recipe and I am no way claiming it to taste exactly like the famous commercially available one back home in the Philippines (although I must admit I copied its look!). I came up with this after much trial and error. The resulting cake is absolutely fantastic, provided you do it correctly of course. The cake base is chiffon, which is quite delicate and does require practice to perfect. Don't be disheartened if you don't get it right the first time. Remember that I am also a homebaker like you.

Some important notes before we begin:

1. Chiffon cakes are usually baked in tube pans because the inner tube is needed to provide support for the center of the delicate batter as it rises. In this recipe, however, we will be using regular (not nonstick) round baking pans. Without the inner tube support, your chiffon cakes will shrink a bit around the center as it cools. This is very normal. You can use a 10" tube pan if you are more comfortable doing so, but you may have to decorate the cake differently.

2. If you are located outside the Philippines, ingredients such as the grated purple yam (frozen), ube flavouring (McCormick), and macapuno are all available in Filipino/Asian stores. If you can get hold of fresh purple yam rather than the frozen one, then much better.

3. The frosting I am using is not the traditional whipped cream frosting that perhaps just uses whipping cream and powdered/icing sugar . This one has cream cheese. I prefer this variation, not only because of its great taste but also because it is very stable. Feel free to use your own whipped cream frosting recipe.

4.  I usually bake the cakes a day before I actually need them.  After they have completely cooled down, I wrap the cakes well in cling wrap, then keep them in the fridge overnight.  This process makes the cakes firmer and easier to work with the following day.

Ube Macapuno Cake


Ingredients:

For the chiffon cake:

{A}
2 1/4 cups cake flour
3 teaspoons baking powder
3/4 cup sugar
1 teaspoon salt

{B}
7 egg yolks (from large eggs)
1/2 cup vegetable/canola oil
2/3 cup milk
1/2 cup (about 100g) grated ube (purple yam)
1 teaspoon ube flavouring
1/2 teaspoon violet food powder or violet gel paste

{C}
7 egg whites
1/2 teaspoon cream of tartar

{D}
3/4 cup sugar

For the frosting:

2 cups whipping or thickened cream
1 250g package of cream cheese
1/2 cup white sugar (edit: added on 21/8)
1 teaspoon vanilla extract
1 12 oz jar of macapuno (preserved coconut sport)

Procedure:

Cake

1. Preheat oven to 170 degrees Celsius. Prepare two 9" round, 2 1/2" high pans by lining bottoms with baking paper. Do not grease.

2. In a large bowl, sift together {A} and combine well. Add in {B}. Beat with electric mixer or by hand just until smooth and well blended.

3. In a separate bowl, beat {C} on high speed until frothy. Gradually add in {D} and beat until stiff peaks are formed. Gradually and gently fold in egg whites into flour mixture until very well combined. Divide batter equally into prepared pans.

4. Bake for about 45 minutes or until a skewer inserted into the center of the cake comes out clean. Invert pans into wire rack immediately and cool completely.

5. Carefully run a thin knife around sides of pans to release cakes. Using a serrated knife, half each cake horizontally. Set aside one of the top halves for use later.

Frosting

Combine the cream cheese, sugar, and vanilla extract in a large mixing bowl or the bowl of a stand mixer. Fit the mixer with the whisk attachment and mix on medium speed until smooth. While the mixture is still whipping, slowly pour in the heavy cream. Continue whipping until the cream can hold a stiff peak.

To assemble:

1. Drain some of the syrup from the macapuno. I do this for fear that the cake will absorb the syrup and get soggy and also to prevent the cake from becoming too sweet.

2. Place one of the cake layers (bottom half of one of the cakes), cut side up on your serving plate or cake board. Spread and level some whipped cream onto the cake layer until it is about 1/4" thick. Scatter half of the macapuno on top of the whipped cream.

3. Place second cake layer, cut side down on top of bottom cake layer. Spread whipped cream and remaining macapuno on top of second layer in the same manner as above.

4. Top the cake with the third layer (cut side down). Spread frosting to cover top and sides of cake. (You don't have to put a lot, just enough for the cake crumbs to stick to it). Remember to leave some frosting for your borders.

5. Crumble the last cake half. (You actually only need to crumble about 3/4 of this cake piece. My suggestion is to leave the quarter for you to snack on!). If you do this with a food processor, you will get very fine crumbs which will look really neat on the cake. You can, however, crumble it by hand. Gently stick the crumbs to the cake top and sides until it is fully covered.

6. Using the remaining frosting, pipe out big rosettes around the cake's top edge.


That's it! Enjoy your very own homemade Ube Macapuno Cake!

Just one final word...You are free to use this recipe all you want but please do not publish it elsewhere without permission. Fair enough?

Let me know how it goes for you! I would love to hear about your cakes!

EDIT: (added on 28/8)

Here's another way of presenting your cake...


To do this:
1. Omit macapuno from filling and ube crumbs on cake top.
2.  Spread macapuno in a circle (about 7" diameter) on cake center.
3.  Pipe out your choice of border around cake top edge.


Monday, August 9, 2010

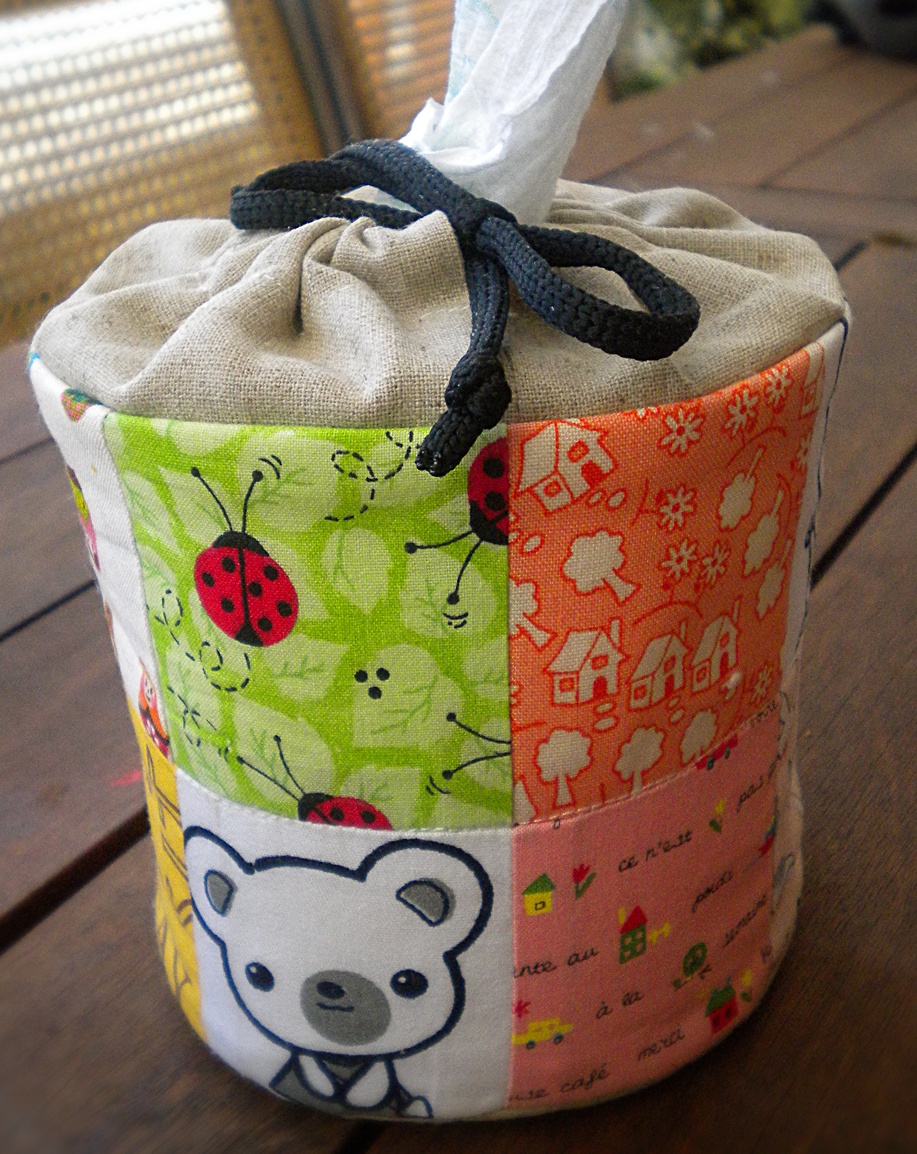
Toilet Paper Roll Cozy

There are tissue box covers.  There are travel tissue holders.  Why not one for a toilet paper roll?

Unlike tissue boxes which now come in a variety of designs and colours, most toilet paper rolls remain plain and white.  And of course, they are uncovered.  A simple toilet paper roll cozy would do great wonders even for the cheapest kind of toilet paper, don't you think?


I used scraps of fabric for this project. It would have been a lot easier if I had just used a single piece of fabric instead of doing patchwork, but the end result is really pretty good, isn't it?


The top closes with a drawstring and the toilet paper is pulled through the hole.


The toilet paper is pulled from the center of the roll rather than from the outermost layer.  In order to do this, I had to remove the cardboard cylinder in the middle.


As always, the trickiest part was attaching the circle base.  The key here is using accurate measurements.  It's not really as hard as it seems.

It was nice being able to do some sewing today for a change.  This toilet paper roll cozy is certainly something I would proudly take with me anywhere. Cute and functional. What do you think?

Sunday, July 25, 2010

Egg-free baking

Up until I was asked for one, I had not baked nor tasted an eggless cake ever.  Eggs have always been a vital part of my cakes especially since I like them light and fluffy (as with chiffon).  I agreed to make one without eggs, though with much reluctance, because I saw this as an opportunity to learn something new.

I found out that there are, in fact, a number of egg substitutes in cooking.  I am not about to list them here as there are already a lot of websites particularly dedicated to this. After doing some research, my inclination was to either use egg replacer or flaxseeds.

I set out to experiment on an eggless carrot cake.  To say the least, my first two attempts were disastrous!  I tried two different recipes but used egg replacer for both.  The first cake was way too oily.  The second, on the other hand, was very heavy, much like pudding. I was so frustrated I fed the cakes to the birds!

On my third attempt, I switched to flaxseeds.  I went back to the first recipe, using much less oil this time (1 cup vegetable oil rather than 1 1/2).

Well, lo and behold, as I took out the cakes from the oven, I saw cakes that looked and felt "normal"...nice smooth tops, soft to the touch.  These had to be it!

I iced the cake with whipped cream stabilized with cream cheese.  I know that carrot cake is traditionally frosted with cream cheese frosting but I just find its taste too overpowering so I switched to something lighter.  It was heavenly!

This was how my finished cake looked like.


I wasn't allowed to use nuts as well so I opted to garnish the cake sides with toasted coconut flakes.
 

I didn't get to taste the cake and was really anxious as to whether it was good or not.  Thankfully, those who got to eat it loved it!  I was told that it tasted no different from the normal carrot cake.  They loved the frosting as well.

So that's it.  Another chapter of my continuing learning experience.  This week, I will be baking for two birthdays, my daughter's and my second son's.  To those who have requested for the recipe of my purple yam (ube) cake, please be patient.  I will get that up on this site soon!  I am also working on a new eBook.  Hopefully, will complete that within a week or so.

Have a great Sunday everyone!

Tuesday, July 6, 2010

Perfect Dinner Rolls

My eldest son had all of his 4 wisdom teeth surgically extracted last Saturday morning.  Except for the normal swelling, he seems to be really recovering very well.  Not a single complaint.

Francis is simply like that.  Very quiet, very much like me.  He just goes about his usual business.  He takes his medications by himself without being told.  He doesn't lie around all day expecting people to look after him. 

Being my first-born, I guess I will always worry about him.  I try not too though.  Afterall, he's 16! 

Yesterday, Francis seemed ready for a bit of chewing (but of course, I consulted him first). I cooked tuna casserole but cut his macaroni into little pieces to make it easier for him.  I also baked some dinner rolls.


Freshly baked bread is always very welcome in our home. Especially my dinner rolls. Just right out of the oven, they are super soft and almost melt in the mouth. My son just pinched off small pieces from his bread and it was a breeze to eat.

I found the original recipe here but I had altered it for KitchenAid use. Below is my version. Use whichever of the two recipes suit you! Enjoy!

Perfect Dinner Rolls


Ingredients:

6 - 6 1/2 cups bread flour
2 sachets (8g each) INSTANT dry yeast
1/3 cup white sugar
1 1/2 t salt
1 t bread improver (optional)
1/2 cup warm water
1 1 /4 cups warm milk
2 eggs, room temperature
1/2 cup melted butter

Put all the dry ingredients (first 5) in your mixing bowl and combine, with mixer on speed 2 only and using your dough hook. Add the wet ingredients one by one, mixing well after each addition. Let the mixer run for about 6 minutes or until your dough looks smooth and elastic.  Turn the dough into a lightly floured surface and knead just a little bit more.

Place your dough in a greased bowl, turning to grease the whole surface. Cover with plastic wrap and let rise in a warm place until doubled, about 1 hour.

Punch down dough and again, turn onto a lightly floured surface. Divide dough into 24 - 30 rolls (or up to 48 rolls if you want them smaller like me) and place in lightly greased baking pans. Cover and let rise again for about 30 minutes.

Bake in a pre-heated 375 degree oven for 20 to 25 minutes or until tops are golden brown.

Store any leftovers in an airtight container and simply reheat in the oven for a few minutes to make the rolls soft again.