Thursday, December 25, 2014

Christmas greetings


From Melbourne to the rest of the world, here's wishing you all a blessed Christmas!

May you receive the lasting gift of joy, peace, and love that comes from Jesus Christ.

Have a great time celebrating with family, friends, and all your loved ones!


Monday, December 22, 2014

My new favourite thing to make

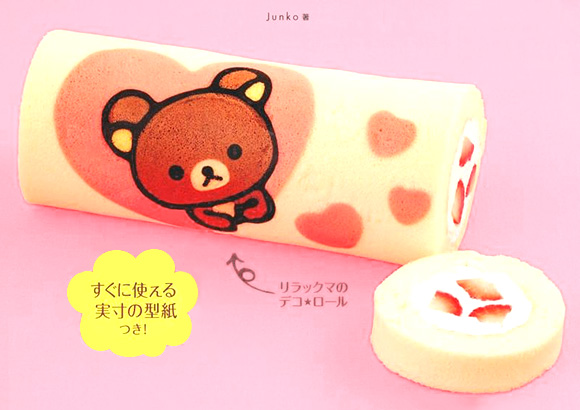
If you still haven't seen or heard about decorated roll cakes, then you must have been living under a rock in recent times!  Deco roll cakes were created and popularized by a famous Japanese food blogger named Junko.  As with anything Japanese-made, these cakes are just oozing with cuteness!

Image credit: kao-ani.com
Image credit: japanrollcake.com

I have been wanting to buy Junko's books since early last year but they were written in Japanese.  I really didn't want to go through the struggle of translating so I had to forego buying them and content myself with just admiring photos of deco roll cakes online.

Just over a week ago, while looking for books on the internet, I accidentally discovered that Junko's books have already been published in English!  Of course, I wasted no time in ordering them!!!


So far, I have tried making three of the deco rolls in the first book, all of them incidentally featured in the cover.

Strawberry print roll - vanilla flavoured cake with whipped cream and strawberries.


Teddy bear deco roll - chocolate flavoured cake with whipped cream, mangoes and strawberries.


Arabesque motif deco roll - matcha flavoured cake filled with whipped cream and sweet red bean paste.


The cakes are chiffon-type so as expected, they are very soft and moist.  However, unlike the chiffon cakes that I am used to making, these ones have less cake flour and have no baking powder.  I think the lower flour content makes the cakes easier to roll.  They do not crack at all!  (And they are not even rolled while still hot.)

As you know, my family isn't all that crazy about eating cake so while I hope to try all of the designs in the books (as well as make my own), I really have to control myself.  At first, I thought the cuteness was enough to convince my kids to keep on eating the cakes one after another, but now I realize that no matter how light and delicious they are, I cannot keep on making them every single day!  I should really consider giving these as gifts!

You will definitely see more of these cake rolls here in the future.  I really wasn't keen on making cake rolls before but now that I've tried and found the process quite easy, I think my next move would be revising my own chiffon cake recipes so they would be more suited to be made in this manner.  Hmmm,,,I reckon I'll start with an ube cake roll. :)

Till next time.

Saturday, December 13, 2014

Ending my caking year

I am so sorry for being away for almost a month.  The 2014 school year concluded early December so as you can imagine, I have my hands full with the kids in the house all the time.  Also, I have been concentrating on finishing all my cake orders for the year.  I am taking a break starting this coming week till early January so I can do things that I have been procrastinating on (#1 on the list: a second book).  Plus I also want more time to prepare for Christmas.

For my last big cake commitment, I made a two-tiered cake, a large caramel cake plus two dozens red velvet cupcakes for an 18th birthday party.  As you will see, I went all out on the buttercream roses! I really like the old-fashioned look they project even though gumpaste flowers may look more life-like.


In this past year, I think I made more caramel cakes than ever before.  Since I started selling cakes, my most sought-after product was the ube macapuno, but now, people have shifted to the caramel cake.  I believe this cake suits the Filipino taste best because it's not overly sweet.  More than that though, there is just something so endearing about the buttercream roses, don't you agree?  Oh and let's not forget those lace-like squiggles too - no matter how messy they seem to appear while piping them, they still end up complementing the whole traditional vibe. 


I really loved making this two-tiered cake although at first, I was afraid it was going to be a complete disaster. While positioning the roses and piping the leaves, I kept on hitting the soft buttercream. This is the downside of using a non-crusting buttercream like SMBC.  You can't smooth it out just like that!  If you look close enough, you will notice the uneven cake comb marks on the bottom tier.  I accidentally touched it and couldn't fix it properly because the ribbon and the roses were already in place :(


I piped all the buttercream roses the night before I assembled this cake and put them in the freezer.  It was a breeze to just position them all later.


I didn't totally go all-buttercream and it would have been really neat if I did.  The #18 topper and the cutout letters for the celebrant's name were made from gumpaste.  I also moulded gumpaste roses and cut out leaves for the cupcakes.  It just saves time to be able to do all these in advance.


So there you go.  That is my way of ending my caking year with a bang.  I still have a few more cakes to do before Christmas though nothing extraordinary.  Hopefully, if all goes as planned, our Christmas cake will be something new.

Monday, November 10, 2014

Triple Zip Cross-body Bag

Now that my friend in Singapore has finally received the bag that I sent her, I can openly talk about it at last!  

Remember the LeSportsac Kasey bag knockoff that I posted here not too long ago? Firstly, I don't want to call the bag by that name anymore.  I feel like going with a more generic term.  Triple zip cross-body bag, ok?


It's quite obvious now that I love navy blue.  The last three bags I sewed are all in this colour.  As the name suggests, this bag has three zipped compartments - the two front pockets and the main bag.  It is just small and ideal to use for when you only need to bring essentials like a wallet, keys, mobile phone.


I used bag zippers this time instead of the more common all-purpose or dress zippers.  They are so much better because the zipper teeth are a bit wider and the pull is longer, making opening and closing the zipper much easier and smoother.


I did my best to stitch very cleanly and to make my zipper corners really neat.  Homemade doesn't necessarily equate to sloppy or imperfect craftsmanship.  It can be as good as store-bought, can it not? (I have the same attitude when it comes to my cakes too.)


See that jacquard ribbon?  I bought that at Daiso which means that it is quite cheap BUT absolutely cute.

I bought the denim fabric years ago with the intention of making a skirt for my daughter. Never got around to doing it though.  What is great about the fabric is that it has embroidered flowers along the length of one edge.


Pretty neat, isn't it? I was even able to make the adjustable, detachable strap this time around!


I am happy to say that I have successfully made the pattern and instructions for this bag, all 36 pages of it!  It is now available in my Etsy shop and also here.  As with all my other eBooks, this one is loaded with photos and the instructions are very, very detailed. So, anyone interested at all?

To my 'once upon a time' online sewing buddies: You have probably lost interest in this blog by now BUT if anyone of you are still out there reading this, please, please, please do say HELLO!  I still love to sew and create (as much as I do baking cakes) and I miss sharing stuff with you. I hope you can still come and visit sometime, leave comments and let me know what you are up to these days.


PS.  My husband's birthday is in a few days and I am planning this new cake.  If it turns out well, I will be back to share that next time.

Have a good week!

Monday, November 3, 2014

Buttercream roses galore!

I used to really dread piping buttercream roses.  Simple reason - I couldn't do it, no matter how hard I tried.  No matter how many YouTube video tutorials I watched.  No matter what kind of buttercream I used.  The easy way out for me had always been to just mould the roses from gumpaste.

After several years of being disappointed at myself, however, I can finally and proudly say that I have conquered the buttercream rose!  So much so, that now, I look forward to every opportunity to make them.


All these roses were made using Swiss meringue buttercream (no shortening) which many even consider too soft for this purpose.  Well let me tell you, it can be done!

I find that freezing the roses before placing them on the cake really makes the process so much easier. What I always do now is make my buttercream first, then pipe my roses (which I set aside in the freezer right after), frost my cake, pipe my borders then arrange the roses last.  Less stress!

One more thing - I'll let you in on my secret?  I don't use the usual rose tip #104 anymore.  The larger tip #124 is so much better.  Don't know why.  Just is, for me.

Now my new goal is to learn how to write properly on the cake!  My writing is almost always off center or crooked, too big or too small. :(  Oh well, one thing at a time!

Have a good week.

Monday, October 6, 2014

LeSportsac Kasey Bag Knock-off

Sorry to all you cake lovers out there, but I have been in sewing mode for the last week or so.  I may have awakened the other part of me that has been dormant for a long time now.  And I am so glad I did!  Sometimes I really long to break away from the kitchen and all that baking.

I really didn't believe I could do it but I did finish a new project just before the school holidays ended. I made a LeSportsac Kasey bag knock-off!


The Kasey bag costs $42-$56 and it's only 7.75 x 9.5 inches in size.  I really like it but I don't think I can ever spend that much money on such a small bag.


I love how my bag turned out. The only thing I regret is using laminated fabric. (I laminated the fabric myself with iron-on vinyl.  That paisley fabric is the same one I used for the mini messenger bag in my last post.) It got all wrinkly when I turned the bag over to its right side.  Maybe next time I will just use cotton fabric or maybe I'll try ripstop nylon.


There is an existing tutorial for a triple zip pouch but I had one look at it and found it too confusing and it's not exactly the same as this bag.  I just did it my way and tried to stay true to how the Kasey bag is constructed. 


I paid attention to all the details and really fussed about the zip ends.  I wanted it to look neat and perfect.


I wasn't in the beginning but I'm really confident now that I can make a pattern out of this.  Fingers-crossed, I will be able to do so in the next week or so.

In the meantime, I can assure my caking friends that I have not taken baking for granted.  It is my youngest son's birthday this coming Sunday and I already have a NEW chiffon cake planned for the day.  So watch out for that!

Have a good week!

Thursday, October 2, 2014

The Mini Messenger Bag Resurrected

Last night, I was going over some of my old blog posts (circa 2008).  One thing I clearly noticed was how different my writing style was back then.  It was much more interesting!  I think it's probably because I wrote about a variety of things - crafting, my kids, my family back in the Philippines, happy days, sad days, etc. These days, it's always about the cake recipes and nothing else.  Boring and repetitive.

The reason I was actually looking back was because I was planning to sew one of my most favourite creations ever - my mini messenger bag.  I had the sudden urge to make a bag because earlier in the day, I was browsing over the Lesportsac website and was drooling over gorgeous but ridiculously-priced bags!  At the same time, I had made a promise to myself to sew something this school holidays (apart from the USB flash drive case) but because life has been pretty chaotic around here (it's been a week now since my husband left to visit his family back home), I decided to just resurrect an old project rather than come up with a new one.

I cut all the fabric pieces before going to bed late last night then made the bag this morning while my younger kids were still asleep.  I was nearly done when they woke up. Before lunch, my bag was already finished!


I didn't buy a single item for this bag.  Everything came from my existing stash - fabric scraps, interfacing, magnetic snap, zippers, and the old strap that originally came from a Kathmandu satchel then later re-used in my other mini messenger bag.

My new bag has all the same great features of my previous bags...

The two front pockets -


The zip top closure - 


The zipper tab - 


Completely lined interior (using pre-quilted fabric here) - 


The adjustable straps -


With an all-new zippered back pocket!


I thought about this change at the last minute and I just love it! 


This bag is totally me.  I'm definitely the denim jeans kind of girl plus navy blue is my favourite colour.

Rarely do I give myself a pat on the back when I accomplish something beautiful but I think I deserve one right now.  Great job, me! :)))

(Just as I finished posting this, I received an email from Strandbags - they are having a sale on brand name bags.  No, thank you. I already have a bag!)


PS. My messenger bag tutorial is here.  Notes on mini messenger bag can be downloaded here.