Tuesday, December 1, 2015

Watercolour buttercream cakes

Over the weekend, I had to make the cakes for my niece's big 18th birthday party. Just as with her older sister's cake, I was given free rein with everything, from the cake flavours down to decorating. Sometimes I find it hard when I am not given any idea of what I exactly need to do.  When this happens, I always look for inspiration from the invite design.

Unfortunately, I can't show the actual invitation here but to describe it simply, the background had splashes of watercolours in violet, electric purple and olive green. I've seen watercolour cakes on Pinterest, so I thought, why not do that! Admittedly, although it seemed easy enough, I was afraid to try this technique because I've never done it before.  What if the colours don't blend properly? What if it turns out messy? What if my niece doesn't like it?

Well, after all that was said and done, I'm soooooo happy that I decided to it.


Instead of doing a 3-tiered cake, I made three separate ones, all in Neapolitan flavours of vanilla, strawberry and chocolate, and frosted in Swiss meringue buttercream.

Here is the 6" cake...


...the 9" cake


...and the 12" cake.


All in all, it was a great experience doing these cakes and I won't hesitate to do something like this again in the future.  The three cakes looked beautiful together and everyone loved them!

If you'd like to try this technique, there are loads of tutorials on the web.  These are the ones I found most helpful - here and here.

A good week to all of you!

Tuesday, October 27, 2015

Prune Walnut Cake

Today, the 27th of October 2015, would have been my mother's 91st birthday.  She passed away more than 6 years ago but my memories of that sad trip back home on February of 2009 has remained vivid to me like it happened just yesterday.  Before I headed back to Melbourne, a brother asked me to look through my mom's things to see if I had wanted anything.  I took with me the simplest of things...mostly things that reminded me much of my childhood - her 1960s pinking shears, a rusty, broken Our of  Lady of Lourdes rosary (which I quickly repaired when I got home), old photographs, hers and my dad's wedding rings (for safekeeping), and this tattered cookbook...

Nora Daza's Let's Cook with Nora
The fact that I can remember this book in our kitchen shelf from when I was a child must mean that it's likely a first edition (the book being first published in 1969).  Surely, I have browsed through these pages hundreds and hundreds of times in my lifetime!  

One of the cake recipes in the book is that of a prune cake. To be honest, I never was interested in trying out this cake BUT since it's my mom's birthday and I particularly remember that she loved snacking on prunes, I thought, why not?


If you are familiar with the prune walnut cake of Becky's Kitchen, then you'd most likely recognize this. 

Actual prune walnut cake of Becky's Kitchen (Image credit: Flickr)

To make the cake this way, I did not follow Nora Daza's recipe to a T. First of all, I had to obviously add walnuts to the cake batter. Also, I had to scale the recipe down as I only wanted a small cake.  

One thing I found unnecessary was stewing the prunes (as instructed in the recipe) because the prunes I bought were already pitted and very soft (as in mashable soft).  


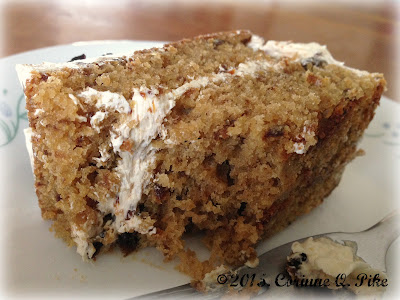
I made a few other minor changes to some of the other ingredients then I was ready to bake.  If you are skeptical like I was before about a cake with prunes, then you have got to just trust me on this one - you will love it! The cake is tender and moist and because it has prunes, it must be good for you, right? :)

PRUNE WALNUT CAKE (suitable for a 7x7 pan)

Ingredients:

1 1/4 cups sifted cake flour
1/2 tsp baking powder
1/2 tsp baking soda
1/4 tsp salt
1/2 cup unsalted butter, softened
3/4 cup caster sugar, divided
2 large eggs, separated
3/8 cup buttermilk
1/2 cup soft, pitted prunes, chopped/mashed
1/2 cup coarsely chopped walnuts

**optional: 1/2 tsp ground cinnamon (if you like a touch of cinnamon taste to your cake!)

Procedure:

Preheat oven to 180 degC. Grease and flour a 7x7 cake pan and line the bottom with baking paper. 
In a small bowl, whisk  cake flour, baking powder, baking soda, and salt (and ground cinnamon, if using). 
In a mixing bowl, using a paddle attachment, cream butter and 1/2 cup of the caster sugar until light and fluffy. 
Add in the eggyolks one at a time. 
In three additions, beat in the flour mixture and buttermilk alternately. 
Blend in the prunes and beat just until combined. 


In a separate bowl, whisk the eggwhites until frothy. Gradually add in the remaining 1/4 cup sugar. Beat until eggwhites form stiff peaks.


Fold eggwhites into flour mixture in three additions. With the last addition, fold in the walnuts as well. 


Pour into prepared pan and bake for about 45 minutes or until a skewer inserted into the middle of the cake comes out clean and/or the cake sides are just starting to pull away from the pan.  Do not overbake!


Take cake out of the oven and let rest in a wire rack for about 10 minutes then invert and release from pan. Let cool completely in the wire rack.

NOTE: Unlike chiffon, this cake does not rise much so don't expect a tall cake!

To assemble the cake:

1. Make Swiss meringue buttercream using the procedure here but with these ingredients:

2 eggwhites
1/2 cup white sugar
150 grams unsalted butter, softened
pinch of salt
1/2 tsp vanilla extract


Alternatively, you can opt to make the easier Old-fashioned butter icing with these ingredients:

150 grams unsalted butter, softened
pinch of salt
1/2 cup evaporated milk
1/2 cup granulated white sugar
1/2 tsp vanilla extract

2.  Fit a smalll piping bag with a petal tip 104. Or if you have a ruffle tip 88 (like the one I used), you can also choose that.  Fill it with about 1/2 cup of the buttercream.

This is tip 88.

3.  Beat in 1/3-1/2 cup of mashed prunes into the remaining buttercream.  Now you have a prune flavoured version!


4.  Cut your cake horizontally in half.  Place top half, cut side up, on a cake board.


5.  Spread a thin layer of prune buttercream.


6.  Top with the other cake half, cut side down.


7.  Cover the whole cake with the rest of the prune buttercream,  (I skipped crumb coating this time.)


8.  Using  a cake comb, make wavy patterns on the cake sides and top.


9.  Using the buttercream in your piping bag, pipe ruffles/garlands along the cake sides.


10.  Divide the cake top into three sections by piping straight ruffles from bottom to top.


11.  Take 6 whole pitted prunes, flatten them slightly and cut 2 slits on one side of each.


12. Arrange half walnuts and prunes alternately on top of the straight ruffles.


Yey, that's it!  A prune walnut cake that looks similar (and hopefully) tastes just like Becky's Kitchen's!


Give it a go!

Monday, October 5, 2015

A Baptism and Some Rosary Bracelets

I had the opportunity to make a baptismal cake this past weekend for the most adorable baby boy.


I really wanted buttercream roses to adorn the front of the cake but I was so tired after having done 3 other birthday cakes earlier that I couldn't do them anymore.  I think though that the simplicity of this cake is what made it more beautiful :) so I'm glad I stopped when I did.

Along with this cake, I also volunteered to make cards and keepsakes for the occasion. 


I did these a week in advance so I actually designed the cake to match them. 


See that beanie the baby is wearing in the photo? Here's a closer look at my cake topper.


Cute, right?

I printed out the cards myself and also handmade the one decade cord rosaries.  The acrylic beads and crucifixes have been in my (almost) forgotten rosary-making stash for ages and it's a good thing I got to use up a lot of them for this purpose. Except for the nylon cord, I didn't spend on anything else.

In the process of making these giveaways, I discovered that I still had a lot of beads and other materials for rosaries.  So I started putting together bracelets for no specific reason and before I even knew it, I already finished a whole bunch!


It's been a long time since I stopped selling rosaries online but I figured since I already had all these bracelets made, there's really no harm in trying again. If you are interested to have one so you can use them for prayer anytime, anywhere, I have them listed in my Etsy shop. I might make some car rosaries as well since I still have a lot of the brown wood beads left.

If you can't have my cakes because you are in the other side of the world, maybe you'd want to own something else created by me?  You can't eat it but you can keep it forever and ever!

Have a good week!

Friday, July 31, 2015

The month of July

July is always a busy month for our family.  Two of my kids were born on this month - my daughter on the 28th and my second son, on the 31st. This year was extra special as my daughter turned 18.

Being an only girl, you might think that we had big plans to celebrate my daughter's birthday.  To be honest, we didn't. Early this year, she went on a study tour to Greece and Italy and I really thought that was it.  No more big party.  After all, the trip was already a huge expense.  My daughter herself was very undecided on whether she wanted a party or not.  Since all her friends were turning 18, nearly all the weekends already had parties scheduled and she couldn't be bothered thinking about what else to do.  

We weren't keen on preparing anything until a friend asked us about it (around end of June) and convinced us to give our daughter some loving attention by throwing her a party.  She was right. 

Come first week of July, I unexpectedly got sick.  Sick enough to be hospitalized.  I suddenly had severe stomach pain one night, went to the hospital a day after to see a doctor, given a blood test and ultrasound and was admitted then and there!  The next day, I underwent a laparoscopic cholecystectomy, or in lay man's terms, a gallbladder removal surgery.  My surgery lasted for almost 4 hours (when normally the procedure only takes one hour) as the surgeon said, my gallbladder was very, very inflammed and infected. I really don't get sick ever so this was all a big shock to me!

While in hospital, plans for a surprise birthday party for my daughter went underway.  Imagine me, as soon as I got home to recover, texting all of my daughter's friends, printing out invitations and handmaking giveways while she was at school.  My husband took care of booking the venue and then for the next 2 weeks, woke up at around 4am everyday to quietly work on a video presentation before going to work. 

I am not going to go into details anymore of how the whole scheme was carried out but suffice it to say that the party was a huge success!  My daughter was clueless and was totally surprised!  Wish I could share with you the video of when she entered the venue and also photos of the party itself, but for privacy reasons, I'd rather not.  It was a fun night with lots of food, a photo booth, touching videos and well wishes even from family in the Philippines.  It was a small celebration shared only with the most significant people in my daughter's life. 

Given my recent surgery, I had little energy to bake and decorate a cake BUT of course, I just had to!  Here's the cake I secretly made for the occasion.  I made it to match the colours of the invitation.


It's small (8") and simple but I loved how the bright colours really popped out.


We didn't serve this cake as there were loads of desserts in the venue.  I sliced it all up and gave it away for some of the guests to take home.  Unfortunately, I don't have photos of the cut cake but it looked really good inside - 4 beautiful layers of green tea cake!

Today, the 31st, it's my son's turn.  He's 20 now! For him, I made another Baskin Robbins-inspired cake.  


It's kind of another version of the cookies and cream but Baskin Robbins calls their ice cream cake, Cookie Overload.  You can understand why just by looking at it.


My cake has two 2" layers of chiffon - chocolate at the bottom and vanilla-Oreo at the top.  It is filled and frosted with chocolate whipped cream and garnished with Oreo crumbs.  It looked a little bit weird with just one whole cookie on top so I added more cookies to finish off.


I will share how I did this cake on my next post, which hopefully will be within the next few days. I took some photos of the process so yes, I intend to be back with them soon!

In case you might want to know, I am feeling ok now.  My incisions have healed well and I am now able to eat normally.  I lost some weight without meaning to and I must say, it is one good thing that came out of being sick!  I am back to doing the usual stuff (except heavy lifting) but I am taking a rest from selling cakes. Understandable, right? Baking once in a while is fine but for now, just for family only!

Hope all of you are well.

Friday, May 22, 2015

Buttercream rose wreath

The reason I have never posted any cake decorating tutorials here before is because I really don't consider myself a cake decorator.  I love to make cakes and if it just so happens that I am asked to decorate it a certain way, then I do so.  I tend to keep my decorations very simple.  I don't like over the top, excessive decorations that cannot even be eaten. 

Today I have decided to share a bit of cake decorating because I think this technique is something that any homebaker can try doing - a buttercream rose wreath!  It seems this type of decoration is trending lately.  Quite lovely really.

To start with, you need to pipe lots of buttercream roses, preferably in different sizes. (Actually, you don't have to limit yourself to roses.  A variety of flowers will look even lovelier.)


For the roses pictured above, I used the Swiss meringue buttercream with shortening recipe that I shared here a while back.  If you have tried using this recipe and have had problems with it being too soft for piping, I suggest you use butter and shortening that are not too soft.  The recipe works perfectly for me but you can certainly use whatever buttercream recipe that suits you! 

After piping your roses, set them aside in the fridge to harden while you frost your cake.

My cake is a three-layered 8" cake.  You can, of course, choose to decorate a smaller or larger cake. The larger it is, the more roses you will need.

Pipe a round border around the cake top about 1" in from the edge.  Here I used a piping bag with a coupler but simply snipping off the end of your piping bag will work as well.  This border is where your flowers will rest onto, so make it thick enough.


Once your roses have hardened, position them one by one on top of the border.  Place them at different angles, some facing out, some facing in, some just upright.


Continue positioning the roses, placing the smaller sized ones in gaps, until you have gone around the entire edge.


Now fill the smaller gaps with leaves using green buttercream and a piping bag fitted with a leaf tip 352.  Alternatively, you can also pipe tiny flowers like blossoms, hydraengeas,etc, to cover the gaps.


That looks quite pretty, doesn't it? Not perfect, but just the same, pretty.

Here is my finished cake.  It's actually for a 70th birthday. Peach and fuschia are apparently the celebrant's favourite colours. (My fuschia is a little off, I think, but it will have to do!)


Clean and simple.  Just the way I like it.

Hope you learned something new to try.  Have a lovely weekend!