Wednesday, May 14, 2014

Flower pot cakes

I'm really sorry I didn't get to greet you mums out there on Mother's day.  I hope you all had a wonderful day and that you were truly spoiled by your loved ones! 

What extraordinary thing did your kids do for you? It's usually the girl(s) in the family who's the thoughful one, isn't it?  With boys, what can you really expect? My sons greeted me as soon as they woke up in the morning then off they went about their own business for the rest of the day.  My daughter, on the other hand, really went all out to make the day special for me.  She bought me flowers and sour lollies (which I love).  And she cooked for the family from breakfast till dinner!  She couldn't get the older boys to do anything but managed to "coerce" her (not so) little brother to somehow help her.

As for me, I made some flower pot cakes for a few of my mum friends.


I've been thinking about buying those silicone flower pots I've been seeing online lately but they seem to only come from the UK or US and are very, very expensive.  So instead, I went to our local home improvement store and bought real terracotta flower pots!  I bought twelve 9cm pots for only 74 cents each!

After cleaning with soap and hot water, I seasoned the pots by greasing each inside and out with oil, and then I put them in a 190 deg C oven for 30 minutes.  When they cooled, I repeated the process one more time. I read that seasoning seals the pores in the pot, prevents future cracking and somehow creates a non-stick surface for the pots as well.

Before baking, I greased and floured the pots first.  Then I filled them about 3/4 full with my chocolate cake batter. I baked the cakes at 180 deg C for about 40 minutes.  One cake was about 2 1/2 times bigger than a standard cupcake.


After they had cooled, I tapped the cakes out of the pots.  They cooked beautifully and came out really easily.  I trimmed the tops so I would have a level surface to put my frosting on, after which I placed them back in their pot.


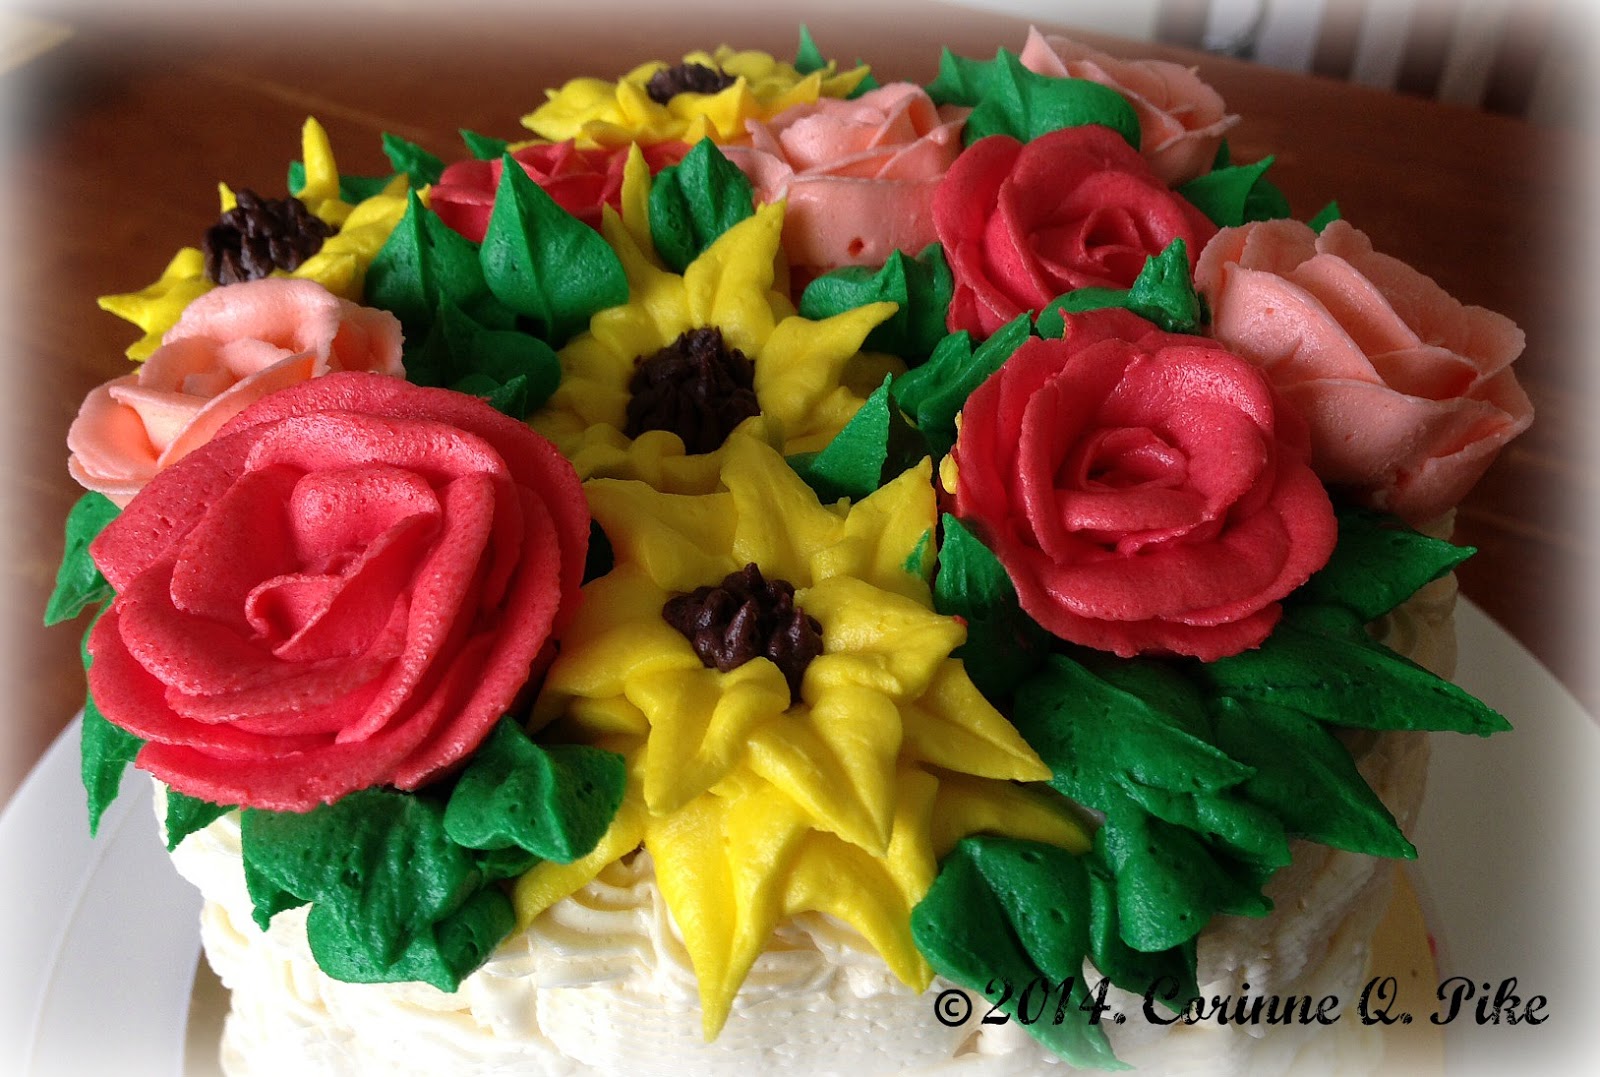
I covered each cake top with chocolate frosting just enough to have a flat surface to pipe my flowers on.  I whipped up a batch of  Swiss meringue buttercream, made small portions of different colours, and then I was ready for the fun part!

First flower: chrysanthemum.  Used tip #81 for the petals, tip #3 for the center and tip #352 for the leaves.


Second flower: sunflower. Used tip#352 for both petals and leaves, tip#4 for the center.


Third flower: hydrangeas.  Used tip#103 for the petals, tip#3 for the dots, tip#352 for the leaves.


And lastly, roses. Used tip#104 for the petals, tip#352 for the leaves.


Here they are all together. Gorgeous, aren't they?


Sadly, I gave them all away!  I didn't leave even one for myself.

But that's ok.  I had a lot of fun and I know I made some friends pretty happy :).


PS.  I have a new recipe to share! It is for a really unique kind of cake. I'm just super busy till the end of this week but will do my best to do so really soon. Watch this space!

Tuesday, April 29, 2014

Leche Puto

**This post has been revised. 28/12/14

I feel somewhat like a sacrificial lamb.  Or maybe a guinea pig.

Because of my desire to share new recipes here, I experiment a lot.  If I'm lucky, I get it right the first time. But if I don't, I find myself measuring, and mixing, and baking, and adjusting ingredients over and over until I am completely satisfied.

It takes a toll on my body, you know. Taking in all those extra, unnecessary calories...sometimes to the point of feeling really sick. But it comes with the job, I guess.

I am happy though when I finally get it right.  And I know that I make a lot of other people happy too.

So, what is this so-called leche puto? Just from the name itself, one can deduce that it's a fusion of the Filipino steamed 'rice' cake (puto) and milk flan or creme caramel (leche flan).  It actually is, just sans the caramelized syrup. I did not know what this thing was until I watched this feature on a Filipino TV show.  The lady in the video said that the idea came about because she found that a lot of eggyolks were getting wasted in her puto-making as only the whites were needed.  It's as simple as that.  Brilliant, isn't it?  How people come up with these combinations? How something so simple can turn into a big business?

They showed the procedure on the video but understandably, not the recipe.  So I watched and watched and watched..and tried to figure it out.

First attempt - great flan, dense puto.  Second attempt - eggy flan, still dense puto.  Third attempt - overcooked flan, fluffy puto.

Four attempts later - a creamy flan, and soft and fluffy puto finally!


I don't know how many of these I had to pop in my mouth to come up with this recipe (I refuse to even think about it!).  So in saying that, I sure hope you all will appreciate and like it!  It will make the sacrifice more worth it!

LECHE PUTO (makes around 48 medium-sized pieces)

Ingredients:

For the flan:
4 egg yolks
1 can sweetened condensed milk (395g)
2 tsps lemon/calamansi juice or 1 tsp lemon extract

For the puto:
2 cups self-raising flour
1 1/2 tsps baking powder*
2/3 cup white granulated sugar
½ tsp salt
4 eggwhites (about 2/3 cup)
1¼ cups water
a few drops of yellow liquid food colouring (optional)

Procedure:

* I found that even if I am already using self-raising flour, I still needed to add a small amount of baking powder to make the puto fluffy.  I think this is because eggwhites toughen a cake and there are no eggyolks to make it more tender. Don't worry, there is no baking powder aftertaste!

**Note:  I used plastic puto moulds for this purpose.  You can use mini muffin pans but you will have to adjust the steaming time.  I tried using the pans in one of my batches and noticed that the flan cooked way faster.  You do not want to overcook it.  The flan should remain creamy yet firm enough to hold its shape.  When it's overcooked, it tastes like scrambled eggs (not good).

1.  Make the flan first.  In a small bowl, mix together the eggyolks and condensed milk.  Add in the lemon juice or extract.


Tip:  Get yourself these inexpensive plastic sauce dispensers.  It makes filling up the moulds so much easier and cleaner.

Use one for the flan mixture and one for the puto mixture.

2.  Heat water in bottom pan of steamer until water boils rapidly. Wrap steamer cover with a towel.

3.  Grease puto moulds then squirt the flan mixture into each mould, filling each about 1/3 full.


4.  Steam flan on LOW heat for about 5-7 minutes. At this point, the flan would not be fully set but should not be liquidy either.  Set aside to cool completely while you make the puto mixture.


5.  In a medium bowl, sift dry ingredients of the puto together.  Add in the wet ingredients and mix just until combined. Do not overmix.  Transfer mixture to your plastic dispenser.


6.  Prepare the steamer as before.  Top up with more water if needed and bring to a rapid boil again.

7.  Gently squirt puto mixture over flan, filling moulds nearly to the top.


8.  Steam the puto on LOW heat for another 10 minutes.  Remove from steamer and let cool slightly.


9.  To remove from moulds, carefully run a thin knife around the puto layer only.  Invert mould and tap to release the leche puto.

I think it is best to keep them inverted like this as the leche flan layer is more delicate and sticky.

Beautiful.  And I can assure you, it's absolutely delicious too.

Enjoy!


PS.  If you have any suggestions on what I should experiment on next, leave them on the comments section below.

Friday, April 11, 2014

Old fashioned butter icing

Back in 2011, when I was still trying to figure out how to make a caramel cake similar to Estrel's, I wasn't sure what kind of buttercream they were using.  The reason I chose Swiss Meringue buttercream was because I had leftover eggwhites from the caramel icing anyway so I might as well use them. I was convinced, however, that it wasn't IT.

Upon tasting the Estrel's famed caramel cake when I visited the Philippines last year, I observed two things about the butter icing - 1) it was salty; and 2) it had a "waxy" feel in the mouth.  It made me question if it was actually butter they were using.  Was it shortening perhaps?

Estrel's say they have not changed their recipe since they started in the 1940s.  In one article I read in their website, the owners mentioned what brand of milk and butter they have been using. To quote:

Quality ingredients more than make up half the success story. “We never changed the recipe, nor the way we did the butter roses and their shapes, sizes and colors of tinted peach, pink and green; nor the thickness and taste of the caramel icing. Before we used GI butter during Liberation. And at that time the best milk was imported Carnation full cream milk (has to be full cream, no dilutions). Now we use Alpine or Omela (from Thailand) full cream milk for the butter icing. And we have never substituted anything for Anchor butter ever since we started using it,” professed Mrs. Navarro.

Although they specifically said "full cream milk", the brands suggested they were actually evaporated and not whole milk.  From this little information, I think I now know how they make their butter icing.

Old fashioned cake = old fashioned recipe.  Why didn't I think of that before?  The recipe below is what my aunties iced and filled their sponge cakes and rolls with.  So simple and easy.

OLD FASHIONED BUTTER ICING

Ingredients:
1 cup butter, softened (I used salt-reduced.)
3/4 cup evaporated or whole milk **
3/4 cup granulated sugar
1 teaspoon vanilla extract (original recipe didn't have this)

**I have tried both types of milk and like whole milk better.

Procedure:
1.  Dissolve the sugar completely in the milk.  Set aside.


2.  In a mixing bowl, cream the butter until it is very light in colour. Start from the lowest speed then gradually increase to high.


3.  Turn down the mixer speed to low then gradually add in the milk/sugar mixture in thin streams.  Do this patiently, like 1 tablespoon at a time only. 


4.  When all the milk has been added, beat in the vanilla extract then increase the mixer speed to high and beat mixture until it is fluffy.

As all butter-based frostings are, the final colour is off-white.


This frosting seems soft but it is stiff enough that it will not fall off the spatula unless you really shake it off.


It spreads really smoothly too.


The taste? It's 100% buttery goodness! It does not only taste buttery but it appears buttery as well.  It actually feels like butter in the mouth!  (I don't know if that's actually a good thing or not!) How do you describe that? Waxy? Slippery? It's exactly how I remember the butter icing from Estrel's (though less salty since I didn't use regular salted butter.)  Definitely heavier in the mouth than Swiss meringue buttercream.

Now, let's test this thing on a caramel cake!

Lacy, squiggly lines, check. (Used piping tip #1 for that.)


More squiggly lines, check.


Borders, check. (Ruffle tip 88 and shell tip 18 for those.)


Roses, check! (Petal tip 124 for the roses, leaf tip 352 for the leaves.)


 Do I really think this is the sort of butter icing that Estrel's uses?

Looks pretty good to me!  The empty space is for some writing I had to add later on.

I am willing to bet on it!  Will I use it?  Definitely yes, for borders and flowers on a caramel cake.  However, to frost a whole cake with buttercream, I still prefer to use my favourite.  Still the winner for me in terms of texture and taste.

Try this butter icing next time you make a caramel cake and let me know what you think.

Have a good weekend!

Saturday, April 5, 2014

Flower basket cake

Sometime ago, I watched this video (most likely in YouTube) in which Buddy Valastro, the Cake Boss, said that he thinks in a few years' time, no one will be using buttercream to frost cakes anymore.  With all due respect, I don't think he knew what he was talking about!  He is a big advocate of fondant but obviously, fondant is not for everyone, me included.  Instead of losing its popularity, it looks like buttercream is in fact making a big comeback!  These days, buttercream-frosted cakes have turned into intricate, sophisticated works of art, just as fondant-covered cakes are.

Because of this, I have made it my goal to improve on my piping skills and take buttercream art more seriously.  Today, I practiced on flower and basketweave piping!

I wanted to place more flowers on the bottom but made the mistake of using a small cake board so there was no space for them!  The sunflower looks out of place, doesn't it?


This is just a small, three-layered, 6" cake but boy, did I have to make a lot of buttercream!  I am not a big fan of crusting buttercream for the simple reason that it is too sweet.  I frosted and filled the cake with my usual Swiss meringue buttercream but made the roses and sunflowers using a classic buttercream with half butter, half high ratio shortening and icing sugar as this is more stable for piping.

Next time, I will use a more dense cake as the weight of the flowers seemed too much for the top layer of my chiffon cake!


It took me a few hours to get this cake done but I did have fun practicing!  My basketweave still needs a little work plus I know I should learn how to better arrange flowers.  Overall though, I was happy with the outcome.  Just the burst of colours was enough to make me smile!


I hope to apply another buttercream-related skill on a cake next week. Maybe, just maybe, I'll be able to do something really nice for Easter.  

Till then, you all have great weekend!

Sunday, March 23, 2014

My niece's 18th birthday party

It was the morning of my niece's 18th birthday party.  I was frosting the cake and I couldn't get it to be smooth.  In my frustration, I started scraping the frosting off so I could start over but in the process of doing so, I accidentally sliced off a big chunk of cake from the side!  At that point, I began to panic.  If I acted quickly though, I still had time to bake another cake so off I went to get eggs from the fridge, only to find out we had ran out....

That was the moment I woke up....yes, it was just a nightmare!  Phew!

It was actually the morning of my niece's party yesterday (for real).  I had already finished baking and frosting 80 red velvet cupcakes the night before and had to empty our fridge to fit everything in. I still had to assemble the two-tiered cake.  I had been a little anxious about this (which explains why I had the terrible dream, I suppose).

To be honest, the party planning was a bit all over the place.  There was no specific colour scheme - the invitation was peach, my niece's dress was burgundy, the place cards were cream, the flowers were white, pink, fuschia, and red!

I decided to go with the peach. Weeks before, I had already planned on paper what I wanted the cake to look like.  Simple, straightforward, clean design.  Something I could handle without stressing too much.

6" and 8" 3-layered cakes, gumpaste ruffle flowers, '18' topper and stars.
I made the decorations in advance so those were dry, solid and ready to go.  The cake?  Easier drawn than done! It was raining all night and yesterday was a gloomy, cold day.  If there's one thing I really dislike about frosting a cake, it is doing it in this weather!  In my experience, probably because of the water in the air, even if my frosting is made in the right consistency, it becomes hard to spread rather quickly.  I turned the heater on to help dry out the air somehow.  I still had difficulty but I think it all worked out in the end.  By 1:00 pm, the cake was boxed and ready.

My daughter and I went to the venue about an hour or so before the start of the party to set up.  The place was absolutely beautiful!  I was excited because it was actually the very first time I would get to see my work displayed in a party this big.


I reckon my niece really liked them - when it was her turn to say a few words to the guests, she thanked me first ahead of everyone else!  I couldn't be more stoked and proud.

It wasn't until probably 9:30 to 10 pm did we get to sing 'happy birthday' then people started taking pictures of and with the cake :).


We had a wonderful night. My back hurts today but now it's Sunday and it's again time to plan for the week ahead.

Hope you all have a great weekend!

Tuesday, March 11, 2014

Hello Kitty cake

I went out of my comfort zone and made a different kind of cake for a baby shower I went to yesterday.  For one, I didn't use a chiffon cake recipe (yes, really!) and secondly, I baked in a novelty pan for the first time!


The Wilton pan I used is actually designed for a one-layered cake only but I wanted two so I baked one cake (vanilla) in that pan and a separate sheet cake (chocolate) which I just carved in the proper shape.  I did this so I would have a flat surface for the bottom layer (without the Hello Kitty face indentations). On hindsight though, I could have just baked the chocolate cake on the shaped pan too then just leveled the cake off. That would have been okay too.  I saved all the trimmings from the sheet cake so I could also make cake pops out of them later.

.
I filled the bottom layer with cut-up strawberries.   Strawberries are quite expensive nowadays but since I didn't need a lot, I didn't mind buying some for this purpose.  I also tried the Rich 'n Smooth Tropic as a filling to go with the strawberries.  I wouldn't normally use something of this sort but the owner of the cake decorating supplies store I go to convinced me to try it.  It's surprisingly pretty good.  Very easy to use, tastes great considering it's non-dairy plus it's not at all sweet.


I crumb coated the whole cake with my usual buttercream but made sure I didn't cover the markings on the top or else I wouldn't know where to correctly pipe the bow, eyes, nose, and whiskers!

I am not a big fan of colouring buttercream, especially when it's very deep colours like red and black.  It's a good thing, I only needed a little of these colours.


After hundreds of little piped stars, the cake was finally completed!  It actually turned out to be bigger than I expected.


Out of the chocolate cake scraps and leftover buttercream, I was able to make 18 cake pops!  I wrapped them individually so I can give them to the little kids present at the baby shower.


What else can I say but that the cake was really delicious! I volunteered to cut and serve as I wanted to see first what it looked like inside.  


The vanilla cake layer was a little taller than the chocolate cake layer so next time, I might just use the shaped pan for both so I would get a more even height.


Overall, I am so glad I tried something different this time.  This is actually a practice cake.  Very soon,  I would have to make the same cake for my son's girlfriend's little sister's birthday.  She is turning 8 and she requested specifically for something Hello Kitty. I'm really looking forward to doing this all over again!