Tuesday, November 30, 2010

Mini Tutorial: How to Make a KitchenAid Mixer Cover

Last week, my sister in-law invited me to their home so I could teach her how to successfully bake a chiffon cake.  As she has a KitchenAid mixer, I wanted to show her how easy it was to beat the eggwhites stiff.  She bought her mixer early this year but has not done much with it really.  

I had always seen her mixer uncovered and her birthday is in a couple of days...so guess what I decided to make for her?

There's no mixer underneath.  The cover is so thick and sturdy, it holds its shape perfectly and stands up on its own.

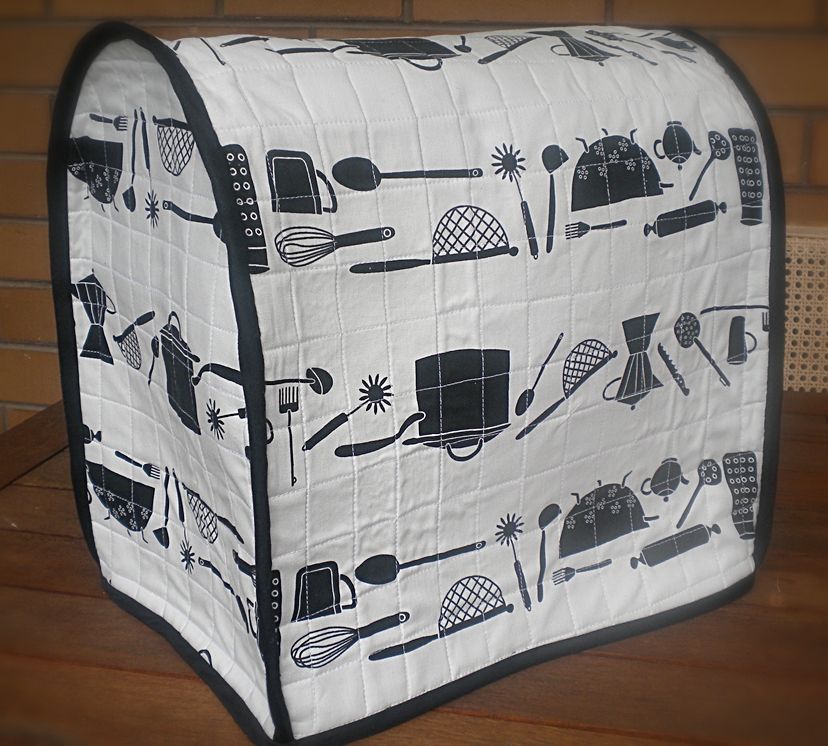
My fabric has directional prints, so as you can see,  the design on the main body is upside down on this side.  I should have taken the photo from the other side!

This is one of those things I wish I could keep for myself, not only because the cover turned out very pretty, but mainly because of the amount of work I put into it.  First of all, I am not a quilter so I was quite impatient with the quilting part of the process.  And why on earth I did so many lines when I could have done less, I really don't know.  Another thing is that I have a fear of bias binding and I also don't quite enjoy hand sewing. I have in fact avoided having to deal with bias binding for the longest time.  Having said that though, it turned out there was nothing to fear after all.  (But I did prick my fingers a few times.)

What made the whole project easier was that I already had an existing pattern.  If you remember, I made a cover for my own KitchenAid mixer sometime ago.  The way I made that one is actually different (this new one is way better), but the fabric pieces are basically the same.

So, ok.  The title of this post suggests that I have a tutorial for this mixer cover.  I call it a mini tutorial because I did not take photos as I sewed.  This will not be as detailed as my other tutorials so some experience in sewing is quite vital.  I am afraid beginners might get lost somewhere. Basically, I will just be providing you with the pattern, the material requirements, and the general steps on how to make your own cover.  Please take note that my cover was made for a 5 quart KitchenAid ARTISAN mixer. 

MINI TUTORIAL: How to Make a KitchenAid Mixer Cover

Requirements:

1 meter quilting weight cotton fabric for outer cover (non-directional prints preferred)
1 meter quilting weight cotton fabric for lining **
1 meter sew-in cotton or polyester batting
quilt basting spray
about 5 meters double fold bias tape in coordinating colour
matching thread
other sewing essentials such as scissors, needles, ruler, marker, pins, sewing machine, etc.

** This cover is reversible.  If you want a change in look every now and then, choose a pretty lining fabric.

Procedure:

1. Download pattern for the front/back panel here.  With Page Scaling set to NONE, print out the pattern pages.  Cut out the pattern pieces just outside the thick black lines and glue together as instructed.

Please take note that since the patterns were drawn with thick marker, you may find slight discrepancies in the measurements.  Please countercheck with indicated measurements and adjust accordingly, if necessary.

After assembling the pattern pieces, you should have something like this:

This is the complete pattern for the front/back panels of the mixer cover.

2.  From main fabric, lining, and batting, cut the following:

    2 pieces each -  16"(L) by 11"(W) for the front and back panels
    1 piece each - 36"(L) by 16"(W) for the main body

3.  For the front, back and main body panels, sandwich batting between the lining (wrong side up) and the main fabric (right side up).  Following the manufacturer's instructions, use quilt basting spray to temporarily adhere layers together. 

4. Quilt panels as desired. (In my cover, the horizontal and vertical lines are about 1 1/4" apart.)

5.  Using the pattern piece as a guide, cut the front and back panels to size.  Trim the main body to 34 3/4" (L) by 15" (W).

6.  To assemble the cover:

Start with the front panel.  Find and mark the center of the curved top.  With lining sides together, match the center of one long edge of the main body panel with the center of the front panel.  Pin together starting from the top, then go down the sides.  Machine sew using a 1/4" seam allowance.

Do the same with the back panel.

7.  Apply bias tape to the front and back seams.  (I machine sewed the bias tape on one side and hand sewed the other side for a neat finish.)

8.  Finish off by applying bias tape along the bottom edges.

Was that understandable?  Frankly,  I am not used to writing a tutorial without loads of pictures to go with it, so I hope that was clear enough.  The structure of the mixer cover is really very simple.  Quilting and bias binding did complicate the whole thing just a bit.  You may opt not to quilt or maybe you can use stiff interfacing instead of batting.  It's up to you. 

Anyway you choose, hope these instructions will be of some help.  Happy sewing!  And happy baking too!

Monday, November 15, 2010

Purple, Green, and Pink

Whew!  Thank goodness the super busy weekend's finally over.  Yes, I survived it and got everything done...and done well, if I may say so myself. Four cakes delivered in one day!

Three of the cakes were Ube Macapuno.  Filipinos do not seem to get enough of this...and understandably so. The fourth cake was for the surprise masquerade themed birthday party of my niece.  It was a two-layered mocha chiffon with creamy vanilla frosting. I had a lot of fun making it.

Except for the candle and the skewers, everything else on the cake was edible.


I was really proud of this gumpaste masquerade mask.  I got the idea on how to make it from this forum
 Nearly everybody's initial reaction upon seeing the cake was "You made that???????".  I really took that as a compliment (rather than a downplay of my capabilities) because it only shows that a self-taught homebaker like me can produce something that looks quite professionally made. 

The colour combination on the cake ended up like that first of all, because my niece's favourite colour is purple.  And then, I made the mask green because I only had green lustre dust on hand and I wanted the mask to have that extra glow.  The pink, I added last, and only because I've seen the three colours combined in fabric.


The fabrics on this pincushion (my latest) was from a vintage fabric roll that came with 25 lengths of six different prints.  I reckoned that if the fabric makers thought this combination was good then it probably would look good as well on my cake!  Do you think so too?

Enjoy the week ahead!

Monday, November 8, 2010

Work in progress

As I mentioned in my previous post, my niece, Claire, is turning 13 soon (on Saturday, the 13th, to be exact).  Her mom has been organizing for her a surprise masquerade themed party.  She has requested me to make the birthday cake, if possible, to coincide with the said theme.  Having no idea what to do (like always), where else can I turn to but the web?  It's amazing what one can learn so quickly from the internet. 

Currently on my work table are these....waiting to harden and dry...

The green lustre dust is not so obvious in the photo, but in person, especially under the lights, the mask has a pearly glow.

Except for the skewers, everything else is edible.  Those little shiny beads are cachous.
Should I attach feathers to the mask?  My daughter reckons I shouldn't bother, but then, all the masquerade mask photos I see on the net have feathers.  What do you think? 

I'm still planning how to lay these gumpaste toppers out on the cake.  I'm actually a little stressed out cause I have two other cakes to make for that same day plus it's my husband's birthday on the 13th as well.  I might not have time to make him a cake!

Fingers crossed, hopefully, I will get everything done.  Till then, have a great week ahead!

Friday, November 5, 2010

Cuteness

Here are a few cute shopping finds and things I've recently made that I'd like to share with you!

Have you seen this around?


They're not ordinary nesting dolls....they're called M-cups, you know why?

Because...they are matryoshkas made to measure!  


Each Russian doll half represents a different measure...starting from a quarter cup up to one whole cup.  I found it at a bookstore (of all places) while I was browsing through baking books.  I ended up buying it instead of a book.  I don't think I would actually use it though...it just seems too pretty to make dirty. 

You can find out more about M-cups and other similar products here.

~ ~ ~ ~ ~ * * * * * ~ ~ ~ ~ ~

If you follow Pink Penguin, then surely you've already seen and drooled over her pincushions.  It's so inspiring to see what great things one can do with little fabric scraps which will otherwise just be thrown out. 

I'm not a quilter and I've never done a log cabin patchwork block before.  I needed to research on how to do that first and then I had to make up my own measurements for the strips.  It was quite easy and I ended up sewing two pincushions yesterday!


The fabrics aren't very much coordinated on my first pincushion but I think it turned out lovely just the same.  Just for information,  I started out with a 1.5" square in the center and ended up with a 5.5" square block.


The second one I made turned out more adorable.  As much as I would like to keep it, I can't, because it's for my niece who is turning 13 very soon.  She has recently taken a keen interest in sewing and is in fact asking her parents for a sewing machine this coming Christmas.


The ribbon on the side says "SEWING Original Handmade".  It's from Japan (where else?) and I found it on Etsy.


I'm planning to give my niece more bits and pieces for her sewing...maybe some pins and thread, and this thing which I had bought a while back...

Can you guess what this little guy is?


It's a retractable tape measure!  How cute is that???? 


It's one of those things I bought on a whim and not because I needed it. I actually have three more retractable tape measures.

~ ~ ~ ~ ~ * * * * * ~ ~ ~ ~ ~

Lastly, here's a pirate-themed cake I recently made for a gorgeous little boy's 4th birthday party.  It's a four-layered chocolate cake and as per the mom's request, it's eggless.  My decorations were kinda messy but thankfully, it was still a hit! 


One of these days, I will share with you the recipe for this eggless cake. My husband and kids actually like it better than the one with eggs.

I've always had difficulty with piping out letters but I think I did a pretty decent job with this one...


Ok, that's about it for now.  I'm off to put my washing up on the clothesline.  It's a nice, sunny day today here in Melbourne!

Wednesday, October 27, 2010

Still watching over me

Most of you already know that my mother passed away in early 2009.  October 27 last year, on the occasion of her birthday, we had a very simple celebration to remember her by.  That day was the day I baked my very first batch of red velvet cupcakes.  Everyone in the family loved this new thing.  Little did I know that those cupcakes would change the course of my life in the coming year.

After I gave boxed red velvet cupcakes as presents last Christmas, my family and friends were quite impressed that they began urging me to start a home-based cupcake business.  I was hesitant of course...I didn't have the confidence nor the skill to bake for people other than my family.  My sister in-law gave me a needed push by handing me my very first cake order.  That was around January.  Since then, I've gotten 24 more...first from just friends, then from friends of friends, and on few occasions, from someone I didn't even know.  Not bad. 

My confidence level is still low though. I tend to look at photos of other people's cakes and then frown upon mine.  There is certainly still so much more to learn and improve on.  What keeps me going is the belief that home-baking is always best.  And even if my cakes and cupcakes do not look as professional as those from the bake shops, the homemade goodness does speak for itself.

It was not a coincidence that this all started on my mother's birthday.  She's still watching my back...from up there.  I will forever be her little girl.


I know that she's pleased that after years and years of searching for what I wanted to do with my life, it certainly looks like I finally found it. 


The cake's for you, mom.  I love you. Thank you for watching over me.

Monday, October 18, 2010

No-fuss (and absolutely delicious!) Banana Loaf

I was not really in the mood to bake today but I had 3 over ripe bananas that I didn't want to go to waste. Thought I might as well do something with them.

I actually use the following recipe for my banana cupcakes but this time, I tried loaves instead, just for a bit of change. I also added some chopped pecans and chocolate chips on top to dress it up a little.

It didn't look pretty as a whole loaf...


but when I sliced it...just lovely...


My daughter couldn't stop eating them.  And one of my friends, to whom I shared one loaf, immediately sent me a text message as her family was snacking on the cake.  They loved it so much she wanted to order some...

No kidding.  For something so easy to make (no mixer needed), it's seriously good.  I also love this recipe because the resulting banana cake is really soft and cakey rather than the usual heavy and dense.


Ready to try it?  The recipe yields two large loaves but as cupcakes, would make about 24 to 30.

BANANA LOAF

Ingredients:

3 cups plain flour
1 1/2 teaspoons baking powder
1 1/2 teaspoons baking soda
1 1/2 teaspoons salt
2 cups sugar
1/2 cup vegetable/canola oil
3 large eggs, room temperature
1 teaspoon vanilla extract
1 cup buttermilk *
1 1/2 cups banana puree**
optional: 1/2 to 1 cup chopped pecans or walnuts
              1/2 cup chocolate chips

*to make homemade buttermilk: In a measuring jug, put 1 tablespoon vinegar or lemon juice, then add enough milk to make 1 cup.  Leave for about 15 minutes until thick and curdled.
**mash about 3 medium-sized over ripe bananas with a fork or in food processor (I prefer it really smooth)

Procedure:

1. Preheat oven at 180 degrees C. Prepare 2 large loaf pans (28cm) by lining bottoms with baking paper. Note: I do not really find greasing the pans necessary.
2. Sift flour, baking powder, baking soda, and salt together in a medium bowl. Set aside.
3. In a large bowl, combine sugar and oil. Add eggs one at a time, beating well after each addition. Mix in vanilla extract.
4. Mix in flour mixture and buttermilk alternately, in three batches, just until combined. Do not overmix.
5. Fold in mashed bananas.
6. Divide batter equally into prepared pans. Top with chopped pecans and chocolate chips, if using.
7. Bake for about 50 minutes or until skewer comes out clean when inserted into cake center.
8. Cool in wire racks before slicing.

Enjoy!

Tuesday, October 12, 2010

Happy birthday Matthew!

Today is my youngest son's birthday.  Even at 9, Matthew remains the "baby" of the family.  Everybody still dotes on him (especially me) and I think, that will forever be the case.

We celebrated Matthew's birthday two days early (on Sunday) and invited a few family friends over.  We gave him his present in advance as well, so he can assemble it and play with it with his friends on the day. 

For the occasion, I prepared a simple mocha chiffon birthday cake with a Super Mario edible icing image.


In the Philippines, mocha cake, along with vanilla and chocolate, are traditional for birthdays.  But while mocha flavour is mostly synonymous to a combination of coffee and chocolate, the Filipino version is just coffee.


My daughter and I made a piñata dedicated to our favourite AFL club (which incidentally won the premiership flag just over a week ago!).  The kids went crazy grabbing the most lollies for themselves.


Today, being a school day, my son went to school bringing a giveaway for his classmates.  I didn't want him handing out the usual lolly treat bags, so I made something different this year.

I found the idea of lollipop cupcakes in this book.  I followed the vanilla cupcake recipe and the resulting mini cupcakes turned out as I like it, soft and moist.  However, because they were soft, the lollipop sticks went right through the top of the cupcake. 

To solve this problem, I had to think of a way to strengthen the cupcake top.  I melted some chocolate (I only had white), then I dipped the tops of the cupcakes into it and next into a bowl of 100s and 1000s.  I let the chocolate set in the fridge for a few minutes.


Before inserting the lollipop sticks into the cupcakes, I also dipped the ends into the melted chocolate.  This process more or less sealed the holes on the cupcake bottom where the sticks were inserted.


I let the lollipop cupcakes chill again for a few more minutes before wrapping each in a piece of cling wrap then finally finishing it off with a ribbon.


What do you think?  Aren't those great?  I am really hoping my son's friends will enjoy this unique treat.  Hopefully, too, I have given you a new idea to use for your kid's next birthday party!

Have a great day!