Monday, April 23, 2012

Yes, it is worth it!

I had another one of those super hectic weeks and I realized (though quite late) that I haven't properly acknowledged all those who left messages, advice, words of encouragement and expressions of concern and belief in me when I wrote this post.  THANK YOU ALL VERY MUCH.  I must admit though that I haven't had much progress into getting my priorities sorted out BUT I will get there, I promise.  In the meantime, just know that I am managing.

There are a few cakes I haven't shared with you yet.  Here they are!

ALICE IN WONDERLAND-THEMED CAKE

My niece turned 16 last month and this was her special request.  Her only specifications were that the cake be blue with no Alice figure.  Personally, I didn't want a whimsical design as most Alice cakes were.  I wanted something quite elegant.


This gumpaste teacup is probably my most favourite cake topper to date.  It's just stunning and pretty.  It does seem complicated to make, doesn't it?  Really, it's not (with the help of this tutorial).  All you will need is a lot of patience.

Another thing that I wanted on the cake was the rabbit's watch.  At first, I didn't think the watch time was important at all and I just made it to be 5:00.  Then my daughter corrected me, saying that tea time in Wonderland was always at 6:00!  I could have left it at that but I just couldn't stand the mistake.  So yes, I discarded a perfectly good watch and made a new one.

Here is the finished topper.


And here is the cake.


My niece appreciated it very much.  And so did all her friends and other guests at her party.

THOMAS THE TANK ENGINE-THEMED CAKE

My kids were never into Thomas.  I don't know....we just found the show quite boring (sorry to those who love the show!).  This is why we don't own a single Thomas toy.  How then was I supposed to make a rather complicated figure with nothing to copy from?

I searched the web and found a few tutorials and videos.  In the end, I decided not to stress too much into making a perfect Thomas with all his parts and details.  For as long as it was recognizable, it would be fine.  Maybe a 3-year old would not be so discriminating after all.


Could have been better but it's not too bad, isn't it?


ANGRY BIRDS-THEMED CAKE

This cake theme seems to be very much requested as the game is so popular with kids.  I don't mind making them cause the birds are so easy to mould, what with their very basic shapes.  The cake topper was all done in one sitting.


I know it's not as elaborate as other Angry Birds cakes are but sometimes less is more, right?

I have another Angry Birds cake coming up soon and this time around, it's going to be the new Space version.  Really looking forward to making that one!

BART SIMPSON-THEMED CAKE

When I was first asked to make this, my initial thought was to just make a 2D Bart.  Moulding a 3D Bart seemed too advance for my skill level.  One night, however, I sat down and just thought of trying.  If I could only make a decent head, then everything else would probably be less difficult.

I moulded the head then asked my kids, "Does this look  Bart enough?"  When they all said yes, I was confident enough to proceed.

Funny how the kids said my completed Bart was too fat. I didn't mind because isn't almost everyone in Springfield?  


I hope you enjoyed reading and looking.  I really have fun making cakes like these.  Sometimes the compensation is great, sometimes not so great.  Sometimes I feel like I work too hard, sometimes it seems like it's more like playing.  Whatever it may be, at the end of the day, knowing that I've made someone happy does make it all worthwhile.

Have a good week!


Monday, April 16, 2012

Shopping

Do you go crazy over Japanese stuff?  I know I do!

Only recently did I find out that there were actually Japanese dollar stores here in Melbourne.  I have been longing to go to a DAISO store ever since I went to one in the Philippines a few years ago, but I didn't know that they had recently opened branches here in Melbourne.  The stores are quite far from where we are, but my daughter and I decided (actually it was more me), that nothing was going to stop us from going.

And so we did.  Twice during the recent two-week school holidays.  To a small store in the city and to another one which was much farther away.  We happily bought a few things.  Some useful, some just because they were adorable.  We agreed that we just had to buy something.  We couldn't have just gone home with nothing.

Small fruit boxes.  My daughter likes bringing cut up fruits to school.
Thread cutter, some ribbons and laces
Kitchen stuff - pie and pizza cutter, lemon squeezer, cake server, cake decorating tool and scraper.
Egg moulds and sushi maker
A compass and a nail clipper
Origami paper
Powdered lemon tea and green tea
There are a few more items not in these photos, like flour crackers which we already ate, a couple of small toolboxes and a ribbon hair tie. That's about it, I think.

Ok, let me just tell you about the powdered green tea.  There was a whole aisle dedicated to food alone and my daughter saw this thing.  I'm a daily green tea drinker so without hesitation, I took two packs.  That night,  I tried it.  You know what it was like?  So sickeningly sweet!!!  I took a peek into the ingredients just today.  The label says, SUGAR (85%), POWDERED GREEN TEA (5%), SUGAR (10%), VITAMIN C.  I don't know why they had to separate the two sugars  and didn't just say 95% sugar straight away.  The lemon tea was practically the same, listing saccharides (which is essentially sugar too) as 96% and the rest of the ingredients making up the 4%.  So, the lesson learned?  Not all Japanese stuff is good after all.

But yes...most still are.

Anyway, speaking of purchases, my husband bought a treadmill yesterday.  I don't really want to say this was an impulse buy, although it does appear that way. We did agree that we, as a family, (sort of) needed it.  I hopped on the treadmill this morning just to try (I was wearing slippers).  After just half a kilometer of running/brisk walking, I already felt light-headed and nauseous!  That's how unfit I am nowadays.  Hopefully, we will all get into shape soon.

Have a good week!


Sunday, April 8, 2012

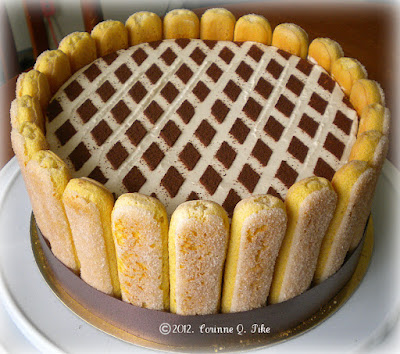
Tiramisu (Our Special Easter Cake)

How do you like your TIRAMISU?  

With alcohol or no alcohol?  

With plain/white, chocolate or mocha cake as base or with ladyfingers? 

Do you have issues about having raw eggs in the filling/frosting (as traditional tiramisu cakes do)?
   
If you prefer a non-alcoholic white cake, and no raw eggs, my version of this cake might just be the one for you!


Isn't that just beautiful? Bet this would cost a fortune in a bakeshop! 


While I aimed to make the cake completely alcohol-free, I later found out that both my chocolate and coffee extracts contained some alcohol.  They are with such small amounts though that using them rendered no alcohol taste and/or smell on the cake.  It turned out just the way I liked it.  Simply gorgeous, very light, not too sweet, with just the right coffee flavour.

Want to make it yourself?

Here's how.

(Nearly) NO-ALCOHOL TIRAMISU CAKE

For the chiffon: (you will need two 8" round, 3" high or two 9" round, 2" high aluminium cake pans)

{A}
2 1/4 cups sifted cake flour
3 teaspoons baking powder
1 teaspoon salt
3/4 cup white sugar

{B}
1/2 cup corn/canola oil
7 egg yolks, from large eggs, at room temperature
2/3 cup water
1 teaspoon vanilla extract
1/2  teaspoon almond extract

{C}
7 eggwhites
1/2 teaspoon cream of tartar

{D}
3/4 cup white sugar

Procedure:
1. Preheat oven to 175 degrees Celsius. Prepare your pans by lining the bottoms with baking/parchment paper. Leave them ungreased. DO NOT USE NON-STICK PANS.
2. In a large bowl, combine {A} well. Add in {B}. Beat with electric mixer or by hand until smooth and well blended.
3. In a separate bowl, beat {C} on high speed until frothy. Gradually add in the sugar {D} and beat until stiff peaks are formed. Gradually and gently fold in egg whites into egg yolk mixture. Divide batter equally onto your two pans.
4. Bake for about 55 minutes or until top springs back when lightly touched. Invert pans into wire racks immediately and cool completely.
5. To release cakes from pans, carefully run a thin knife around sides of  the pans and invert cakes to release. **Tip: For easier handling, wrap your cakes very well in cling film, then refrigerate overnight before frosting.

For the coffee syrup:

1/2 cup water
1/4 cup white sugar
1 tablespoon espresso coffee granules/powder
1 teaspoon chocolate extract

Combine water, sugar, and coffee in a small saucepan.  Over low to medium heat, bring to a boil, mixing constantly until sugar and coffee are dissolved completely.  Remove from heat then stir in the chocolate extract.  Set aside to cool.

For the mascarpone filling/frosting:

250g tub of mascarpone cheese, room temperature
2 cups chilled thickened/heavy cream
1/2 cup white sugar
1 teaspoon coffee extract

Using chilled bowl and beaters, whip together the thickened cream, sugar and coffee extract until stiff.  Fold in the mascarpone cheese until well combined.

TO ASSEMBLE THE CAKE:

You will also need:
about 1/2 - 1 cup unsweetened cocoa powder
sponge (lady) fingers or savoiardi biscuits, about 24-30 (depending on size of biscuits and cake)
ribbon (optional)

1. Cut the two cakes horizontally in half. (We only need three layers, so set aside one of the top layers for snacking later).

2. Place one bottom layer, cut side up on your cake board.  Brush the entire surface with coffee syrup.  Be careful not to over soak your cake.  On the other hand, do not scrimp on the syrup too as you will not get enough of the coffee flavour.

3. Spread about a 1/4" thick mascarpone filling evenly over your cake layer.  Dust some cocoa powder over the filling then top with your second cake layer (cut side down, top of cake up).

4. Brush coffee syrup, spread filling, and dust cocoa powder as before.  Top with the last cake layer (cut side down, bottom side up).

5. Again, brush surface with coffee syrup, then spread remaining frosting on top and sides of the cake.

6. Dust cocoa powder over the cake top.  (I used a lattice stencil to achieve the pattern in my cake.  Nicer finish, but not necessary). Stick the lady fingers around the cake sides.  Tie a ribbon around if you like.

There you go!  A great, special occasion cake right from your own kitchen. That wasn't too hard, was it?

Enjoy! Have a blessed Easter!