Wednesday, March 28, 2018

Cookies for Easter

It's that time of the year again when I get to bake these cookies....

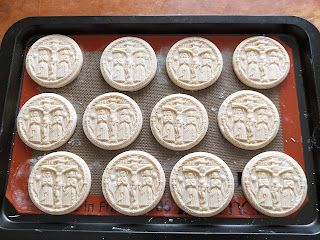
Before baking


Even if I've made them in different moulds many times now, the outcome never ceases to fascinate me! The details are just amazing!

After baking

Springerle cookies differ from most cookies as it uses baker's ammonia as the leavening agent.  (Baker's ammonia was the primary leavening agent used before baking soda and baking powder came to being. ) They have to be air-dried for about 24 hours before baking in order to keep the integrity of their design and are baked at quite a low temperature, resulting in a white cookie.  They are soft and cakey, rather than crisp or crunchy. They are traditionally flavoured with anise but since I don't like anise, I use vanilla extract as flavouring instead.

Springerle moulds are quite expensive and hard to find here in Australia. I have 7 of them now but I bought them one at a time over the course of three years 😉. I only make these cookies for special occasions like Christmas and Easter.

Last October, when two of my kids flew to the US to attend their cousin's wedding in NY, I sent over these...


I made sure I packed the cookies really, really well so they would make it to the US intact! Thankfully, they did!


Last Christmas season, I sent another batch overseas, this time to my family in the Philippines.  My brother, who also lives here in Melbourne, went home for another brother's 60th birthday.


If you would like to learn how to make springerle cookies, HERE is where I learned to make them from.  You can find a lot of moulds online especially in the US.  One of my favourite shops to get them from is this Etsy shop. In Australia, I found some here. I hope you will be encouraged to try them!

I wish you all a blessed and meaningful Holy Week. May you experience Christ's glorious Resurrection and be filled with true Easter Joy all the days of your life!


PS.  I have listed another four "Cakes from the Heart" softcover books in my Etsy.  As these copies were printed before the error on the Yema Cake page was discovered, I will be sending the corrected PDF along with the book. Anyone interested, just head on over to my shop!
Friday, March 16, 2018

How to make a pillowcase with an inner flap

Remember this cake?


This was the cake I made for my grandson's first birthday, remember?  I made it to look like his much loved teddy bear (which we fondly call "Bearie"). At 2 years and 7 months old now, he still sleeps with Bearie, along with a whole lot of other cuddly creatures.


This post is not about the teddy bear or cake though.  It is about pillowcases! I've been making lots of them lately. 


I've never bought licensed beddings before as they are really expensive. Licensed fabrics are too, so I only buy them when they are on sale. Now my grandson has lots of pillowcases with his favourite characters on them 😍!


I thought you might like to learn how to make these pillowcases. They are great for any level of sewer, even beginners. Simple straight stitches and no serger required. They are fun and super easy to make! Here goes...

HOW TO SEW PILLOWCASES WITH INNER FLAPS

For a pair of pillowcases, you will need:

1 meter (or yard) printed quilting weight cotton fabric (for the pillowcase front)
1 meter (or yard) coordinating plain quilting weight cotton fabric (for the pillowcase back)
coordinating thread
sewing machine
other sewing essentials like ruler, fabric markers, pins, scissors. etc.

Before you begin this project, find a pillowcase that you already have that suits the size of your pillows. You need to base your measurements on your pillowcase because "standard" sizes vary.

Measure the length (longer side) and the width (shorter side) of your pillowcase. (I will be using inches in the tutorial.) Take note of these dimensions as your Length (L) and your Width (L).

1. From your printed fabric, cut two pieces with dimensions: L plus 2" by W plus 2".  From your plain fabric, cut two pieces with dimensions: L plus 7" by W plus 2".


2. With wrong side facing up and shorter side on the top, fold the top of your printed fabric 1/2" in.  Press. Then fold another 1/2" in. Press again.


2. Do the same thing with your plain fabric. After the two 1/2" folds, fold again 5" down. Press.


3. Stitch the 1/2" folds on both printed and plain fabrics.


4.  With wrong sides facing, place the front and back of the pillowcase together. Pin in place.


5. Using a 1/2" seam allowance, stitch down one long side, then along the bottom, then up the other long side.  Do not stitch the top of the pillowcase!


6. Trim the seam allowance to about 1/8". Clip the bottom corners as well. Be careful not to cut into the stitches!


7. Turn the pillowcase wrong side out. Push the seams and corners out well.


8. Turn the flap over to the front side. Doing so will enclose the opening at the top. Make sure the top edges of the two fabrics are aligned well, especially the corners. Pin in place.


9. Sew the bottom and sides as in step 5.


10.  Turn the flap over to the back side (revealing the pillowcase opening), then turn the pillowcase right side out. That's it! Too easy, right? Now go make the other one!


And then some more!


Hope you find that helpful! Next time, I will show you one way you can make use of the excess pillowcase fabrics.

Have a good weekend ahead!