Friday, June 25, 2010

Just another side of me

I took piano lessons for a number of years when I was young. I suppose I was quite good then because my piano teacher was sort of grooming me to get into the Conservatory of Music when I started college. Unfortunately (for her), I had no such plans. I quit taking lessons about a year before I finished high school. One of my life's poor decisions, I guess.

I completely lost access to a piano when I got married and moved out of our home. Expectedly, my skills turned very rusty. Today, we both have a piano and a keyboard and so now, I get to make music occasionally. I am not that good anymore though. It takes a while before I figure out how the notes are played especially when there are so many sharps or flats involved! I hardly perfect any piece I play. The good thing is though, piano playing is much like riding a bike...you never forget it even though you've gone years without practice.

Yesterday, out of the blue, I thought of taking a video of myself playing a piano piece (well, it's actually just my fingers seen on the camera). This is a side of me that's really unknown to many. I am not out to impress or anything like that. I even made a couple of slight mistakes in the video but I kept playing anyway (shame on me!). I hope you'll consider the fact that I haven't played in front of an audience in like 25 years or so!  Having said all that, don't expect to be blown away, ok?

Without further ado, here I am, attempting to play David Benoit's classic Kei's Song from 1987. It's a rather short version for two reasons: 1) because I do not know how to adlib; and 2) I did not want to play the difficult part twice.

Anyway, enjoy!


And here's the real version. I am nowhere close!


Wednesday, June 23, 2010

Tips re Water Bottle Carrier pattern

A couple of ladies have emailed me recently asking for some help with my water bottle carrier pattern.  I've decided to make this post to give some tips not only for them but for others who have bought the eBook from me as well or for those who are thinking of doing so in the future.

The main concern has been how to pin the circle base to the cylinder body so it will fit neatly.  Before I proceed, it is my assumption that: 1) the required seam allowance for the cylinder was followed strictly, and 2) the circle base diameter was correctly obtained using the formula in the eBook.

Why does the circumference of the circle base seem bigger than it should be?

The answer is...because it really should.  The unsewn circle base includes the seam allowance, therefore, it's circumference is slightly bigger than the circumference of the already sewn cylinder.


When aligning the circle base to the cylinder, do not attempt to pin together along the edges because it will not work.  What you should be aligning to the cylinder is the (imaginary) stitching line, as shown in the photo above.  To do this, press the edges together, push the center of the circle in and pin where the stitching line would be.  You may not find the exact fit immediately but as you adjust the pins, it should end up fitting correctly.

After you have sewn the pieces together, you will see (as in the photo below) that the circle base is pushed in.  The final circumference of this circle is now exactly the same as the body of the carrier.


When you turn the bag to its right side, you should have a nice circle bottom with no tucks (or if there is any, it shouldn't be noticeable).


I don't know if my explanation was clear enough, but again, with accurate seam allowances and correct circle diameter, you shouldn't have any more problems.

Let me know how it works out for you.

Saturday, June 19, 2010

Copycat


Here are a couple of things you've probably seen elsewhere that I recently made my own versions of. I do not mean to be a copycat but sometimes it's just nice to know that, rather than buying, I can just make them myself...

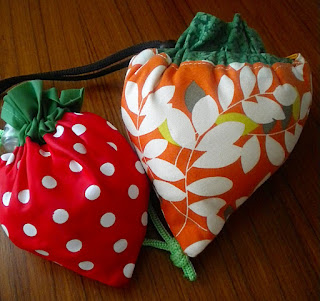
Fruit/Vegetable Shopping Bags

You've seen these around, haven't you?


Each fruit/vegetable pouch opens up to reveal a shopping bag scrunched within. Neat, huh?

A few days ago, I found a great tutorial on how to make one of these cuties! While I didn't need another shopping bag (I already have heaps!), I nevertheless tried to make one, just for the fun of it.


I made my pouch a little bigger since my fabric was thicker...alas, it still wasn't roomy enough. I see now that it was a bad idea using medium-weight fabric since I really had to squish the bag into the pouch. I ended up making it very wrinkly, which is not great at all. But it was worth the try anyway. I would probably do this again once I find out where to buy the right material.

Purple Yam (Ube) Cake ala Red Ribbon Bakeshop

We had a small gathering last night to remember my brother Rey on the 40th day since his passing. I made another purple yam (ube) cake for our after dinner dessert. This is one cake I have been trying to perfect for a while now.

Red Ribbon Bakeshop makes the best commercially available ube cake in the Philippines. They have branches in the USA but none here in Australia, so there is really no way I would be able to satisfy my craving for this kind of cake than by baking it myself. I have in fact already come up with a recipe that more or less approximates the same taste and texture. But what I really wanted was something comparable to the Red Ribbon ube cake look. So that is what I set out to do. I think I finally did it!


The cakes on the left are file photos of Red Ribbon ube cakes on the web. The one on the right is mine. Both versions are three-layered chiffon cakes covered with whipped cream frosting and ube cake crumbs. Both have piped rosettes on the top too but I added the stars in the bottom because I had leftover frosting. I know my cake looks more like indigo (deep blue purple) in the photos but really, in person, both cakes are very similar in colour. Both vibrantly purple!

Instead of using the same whipped cream frosting as filling, I made an ube/macapuno pastry cream to spread in between the cake layers.(Macapuno is basically young coconut that is simmered in water and sugar until the mixture becomes syrupy. It is readily purchased in bottles.)


Did my cake taste like Red Ribbon's? Absolutely! It was super moist and turned out as beautiful as I had imagined it to be. The pastry cream made it so much richer...too rich for my taste actually...I think I will just stick to whipped cream and keep it simple...

My copies weren't perfect...but they were in fact quite good. For sure, I can only do better next time around.

Enjoy the weekend everyone!

Thursday, June 3, 2010

Tutorial: How to Make a Patchwork Pillow

A long overdue tutorial!  I say this because I had planned on doing this a good six months ago when I made my first patchwork pillow.  Thankfully, I still had all the materials in my stash, most of which are simply leftovers from previous projects.

This pillow can be sewn even by beginners and will take only an hour or two to whip up.  Interested?  Let's get to it then!


How to make a Patchwork Pillow

Finished pillow size: 16 3/4" square
Seam allowance: 3/8" throughout

Requirements:

18  - 5" by 5" quilting cotton squares in assorted prints
approximately 18" (H) by 25" (W) plain cotton fabric (I used natural linen)
polyester filling
sewing essentials such as thread, needle, sewing machine, ruler, marker, pins, etc.
basic sewing skills

Procedure:

1.  Cut plain cotton fabric in the following manner:
     4 pieces - 2 3/4" (H) by 13 1/2" (W) for top and bottom edges of pillow
     4 pieces - 17 1/2" (H) by 2 3/4" (W) for right and left sides of pillow

2.  Position nine squares into 3 rows of 3 squares each row until desired layout is achieved.


3.  Assemble top row by stitching the squares right sides together.  Press the seams down to the right.


4.  Stitch the middle and bottom rows in the same way.  Press the seams down in alternating directions.


5.  Stitch rows right sides together along the long sides to complete the 3 by 3 patchwork square.  Be sure that all seamlines are aligned.  Press the horizontal seams open.


6.  With right sides together, sew top and bottom strips to patchwork square.  Press top seam upward and bottom seam downward.


7.  With right sides together, sew right and left strips to the patchwork square.  Press right seam to the right and left seam to the left.


8.  Repeat steps 2 to 7 for the other side of the pillow using the remaining squares and strips.


9.  With right sides together, sew front and back of pillow all around but leave a 3" opening in the bottom for turning.  Clip corners.


10.  Turn pillowcase right side out, pushing corners out well.  Stuff firmly with polyester filling.


11.  Slipstitch the opening closed.


There you have it, you're all done! Easy, wasn't it?  Enjoy your new, one-of-a-kind patchwork pillow!


Hope you all found the tutorial helpful.  Have fun sewing!


PS.  I will make a PDF version of this tutorial available shortly. DONE! Download it here.